A Hex Value's Journey: Book III - Post
This is the third part of a multi-guide series that follows a single color through a color management journey. This one focuses on using the Picture Viewer as a rudimentary post app.
About this guide
This guide is also available in 📄 PDF format here
Version 1.0. Created using Octane 2026.3.
This is part of a multi-guide series that follows a single color through a color management journey. It’s written as more of a story than a factual how-to guide to hopefully make it more interesting, palatable, and memorable.
This third book covers post production, using C4D’s Picture Viewer as a rudimentary post app to explain the process.
If you haven’t read Book I: C4D, or Book II: Octane, it’s highly recommended even though they haven’t made the New York Times Bestseller list (yet?).
Book III: Post
Part I: Post Color Management
Fix it in Post
In books I and II, we were mostly concerned with aligning Octane with Cinema 4D to make sure our colors stay as expected through those parts of the pipeline.
In some cases, that’s the whole story, but more often (especially in professional workflows), what comes out of Octane is meant to go into another app like Nuke, Fusion, After Effects, or something similar for further editing and refinement.
That’s what we call “post production”, or just post.
Ideal post color management workflow
First, Let’s explore what an idealized color management workflow looks like so we have a target to aim for. This is not how it always works, but it’s how we want it to work.
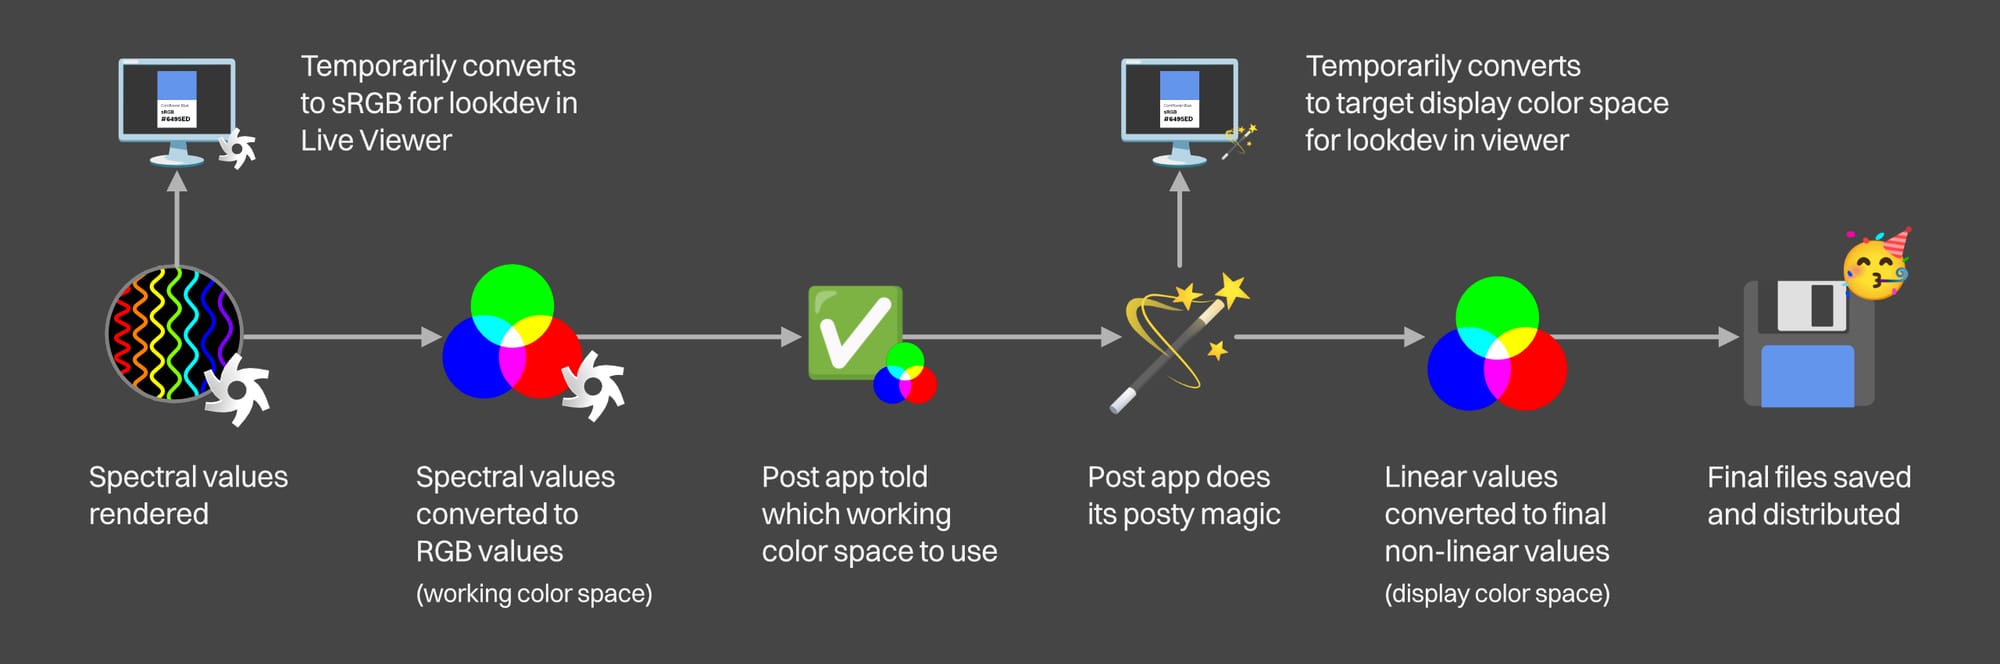
- We make our 3D scene in our DCC and send it to Octane to render.
- Octane renders spectral data, and then temporarily converts it to (non-linear) sRGB values on the fly to preview in the Live Viewer so we can see what we’re doing. Tone mapping is applied just to the preview (not the final exported data) as part of this process to give a better idea of what we can expect later on.
- Looks amazing, time to export to post.
- Octane converts the spectral data to RGB values using a standard working color space like ACEScg or Linear sRGB (or log if we’re combining it with footage). Again, tone mapping is not applied here - that will happen in the post app.
- Octane packages the converted RGB source files up and sends them to the post app (usually via EXR or TIFF files)
- The post app is told which working color space Octane used when exporting the files (ACEScg, Linear sRGB, etc). It now has the right basis to work from so that everything down the rest of the pipeline is correct.
- The post app then combines, composites, color grades, and applies post processing voodoo to make everything look polished, magically fix everyone’s problems, and save the day.
- While it’s doing this, it temporarily converts the values on the fly to whatever our final target display color space is (sRGB, rec.709, DCI/Display P3, etc.) so we can see what we’re doing. Our monitor is set to whatever our target color space is, and is calibrated properly - no surprises.
- Post is done, time to ship it.
- The post app does its final conversion from the source working space values we were using for editing into the final display space values we’re going to use for distribution, applying whatever tone mapping scheme we were using throughout the process so they match the preview. The final files are exported in the desired format, and we send them to the client on time and within budget. Everyone’s happy with the results, we immediately get paid, the work’s done, and we don’t need another round or two of “tiny” tweaks minutes before the deadline to make it pop more (idealized, remember?).
The Picture Viewer as a Post App
Cinema 4D’s Picture Viewer can be thought of as a very basic post processing app. It takes high bit depth source data, alters it, and then produces low bit depth files that we can distribute, just like one of the big boys or girls (Nuke, Fusion, After Effects, etc.)
Granted, it’s nowhere near as powerful, but it can give us an idea of how this all works without having to split this out into 10 guides (everyone following along has it already and doesn’t need to leave C4D), and also can be another tool in the box when it comes to quickly previewing or shooting out client proofs without needing to fire up another app.
Behind the Scenes
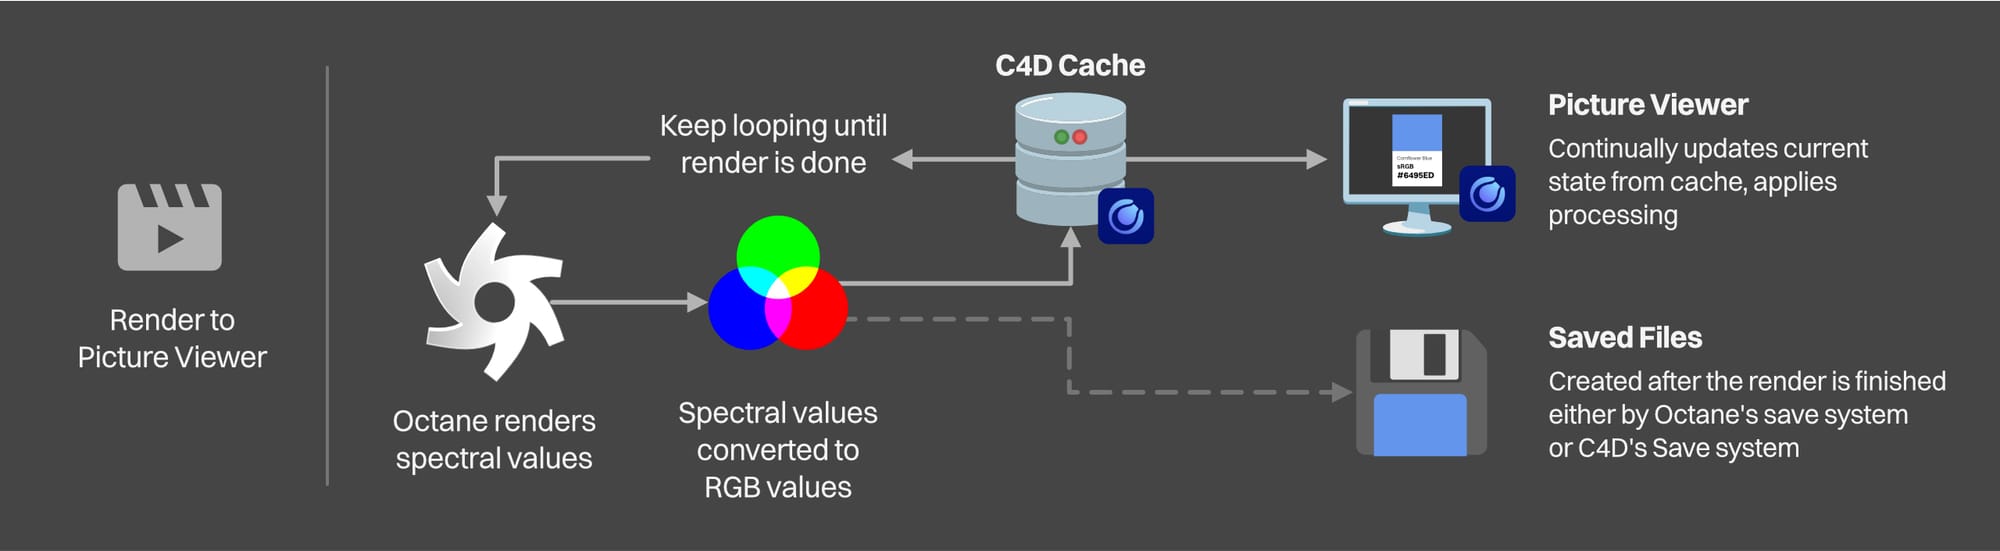
When we hit the Render to Picture Viewer button, Octane starts rendering and sends a stream of updated render states to the C4D after every x number of samples are finished. C4D stores the first state of a frame in a cache somewhere on disk, and overwrites it with a new version every time Octane sends one. This keeps happening until Octane hits the max samples and finishes rendering. For an animation, it waits until one frame is done, the final version of that is stored, and it moves on to the next frame in the series.
Every time C4D receives one of these new states, it processes it (applies a transfer function and tone mapping) and updates the image that we see in the main area of the Picture viewer.
Important: Sometimes C4D can’t keep up with the processing, and we may encounter situations where we’re seeing the image either too washed out, too dark, or just plain wrong, but then suddenly it’s fine. It’s important that we wait for this to happen before making any judgments about whether it’s working properly or not.
Independently of this whole caching/viewing process, Render to Picture Viewer also triggers a save process when the render is complete and processed, which we saw in the previous book in this series. Again, we don’t need to save files when we Render to Picture Viewer - we can turn off saving from both Octane and C4D and just send a stream of data to the cache and it’ll show in the PV just fine.
The Picture Viewer also gives us the ability to save the processed files in a variety of formats, just like a real post app.
Part II: Enter the Picture Viewer
Decisions, Decisions
There are a few things we need to have at the ready before we go any further:
- Which working color space are we going to use? ACEScg is default in C4D now, and that’s a perfectly fine option. Linear sRGB and ACES2065-1 will also give us near identical results. It’s not a quality issue, it’s a choice that we just need to settle on and remember so we can tell our post app (or others on our team) which one we’re using so we/they can set other settings accordingly.
- What kind of tone mapping situation are we thinking our final files will use? We don’t need to decide this now, but it really helps with pre-visualization. Let’s say we decided on ACES RRT+ODT (or just “ACES tone mapping”). The files we send to post won’t have this baked in, but while we’re developing lights and materials in the Live Viewer, we’re going to make different decisions with our lights and materials so that when we do apply this in post, there won’t be any huge surprises.
- Less important most of the time, but still something to be aware of is the display color space we’re targeting. As of this writing, we’ll only be able to accurately preview our scene in sRGB (or rec.709 if we have our monitors calibrated to that). If our target is Rec.2020, DCI-P3, or something else, we’ll just have to know that what we’re seeing in the Live Viewer won’t be the final. We’ll be sending over enough data to accommodate those wider gamut spaces with our EXRs, but we’ll only see what that really looks like when we get into post.
The Picture Viewer as a Post App
This probably isn’t going to be the way we work on any normal project, but it’s a good illustration of how the whole process works.
Step 1: Align the working color spaces
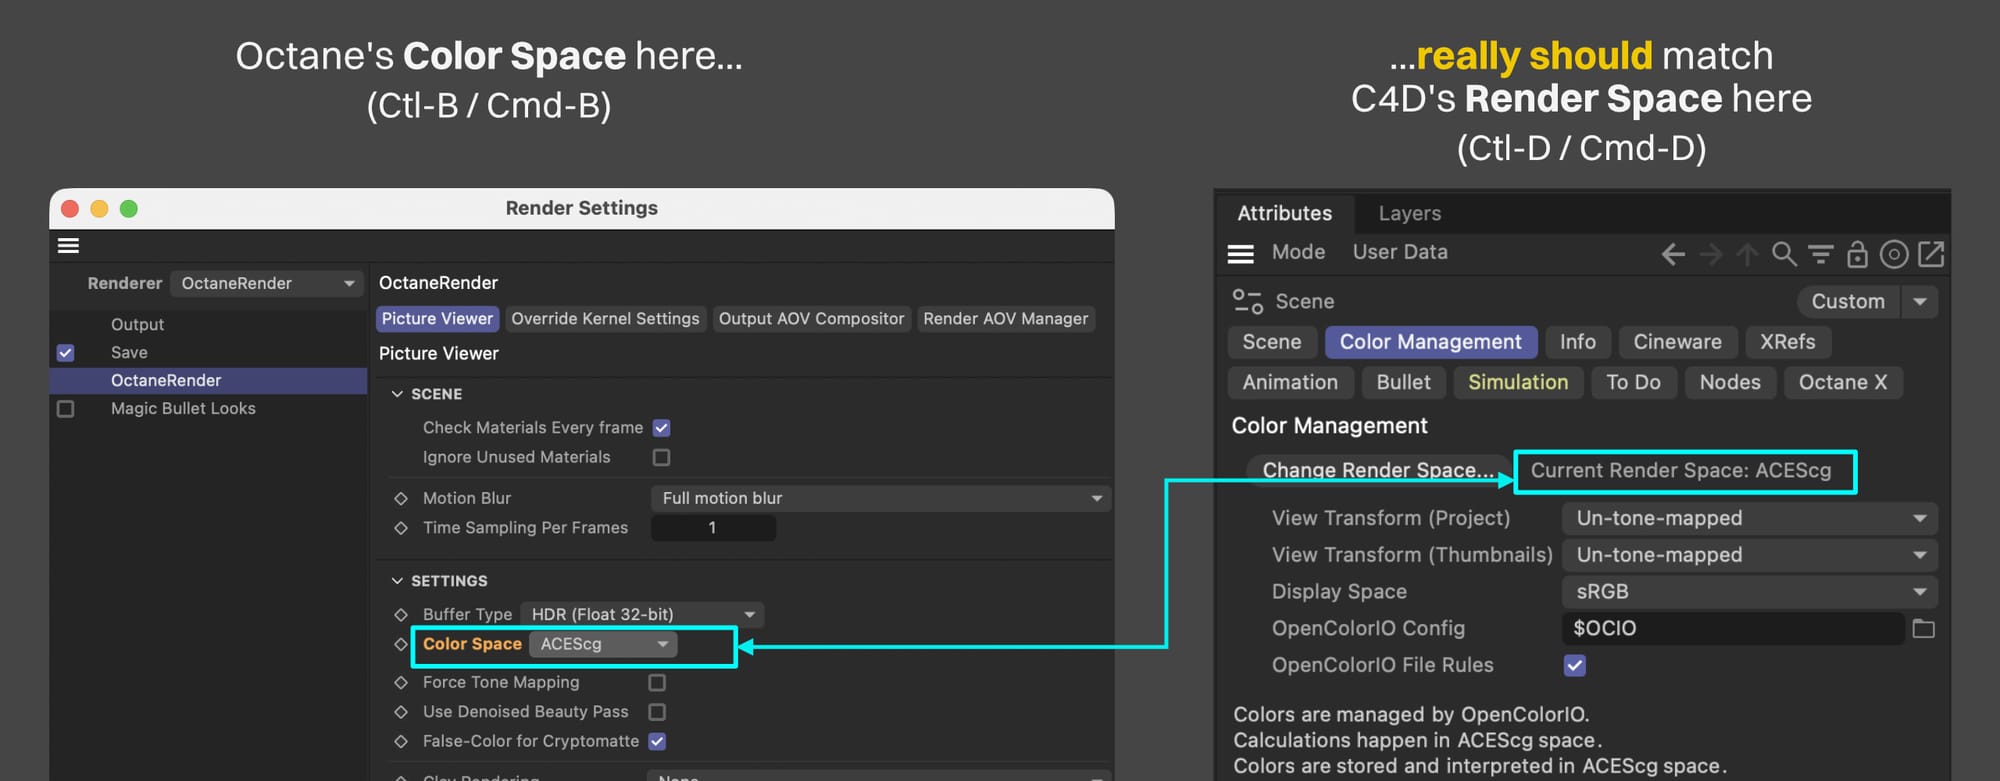
We’ll start with C4D. If we hit Ctl-D or Cmd-D to get into the Project Settings and head to the Color Management tab, we’ll see what C4D is using as its working color space. For reasons still unclear, Maxon decided to call this a Render Space.
If we hit Ctl-B or Cmd-B now, we can pop open C4D’s Render Settings window. In the OctaneRender section (assuming we have our Renderer set to OctaneRenderer), in the Picture Viewer tab (which was called “Main” up until last week), we’ll see the Color Space that Octane will use when it’s sending data to C4D.
Important: These two really need to match. We will have the option to re-align them later, but it’s more annoying and we have better control over the situation if we just do this now.
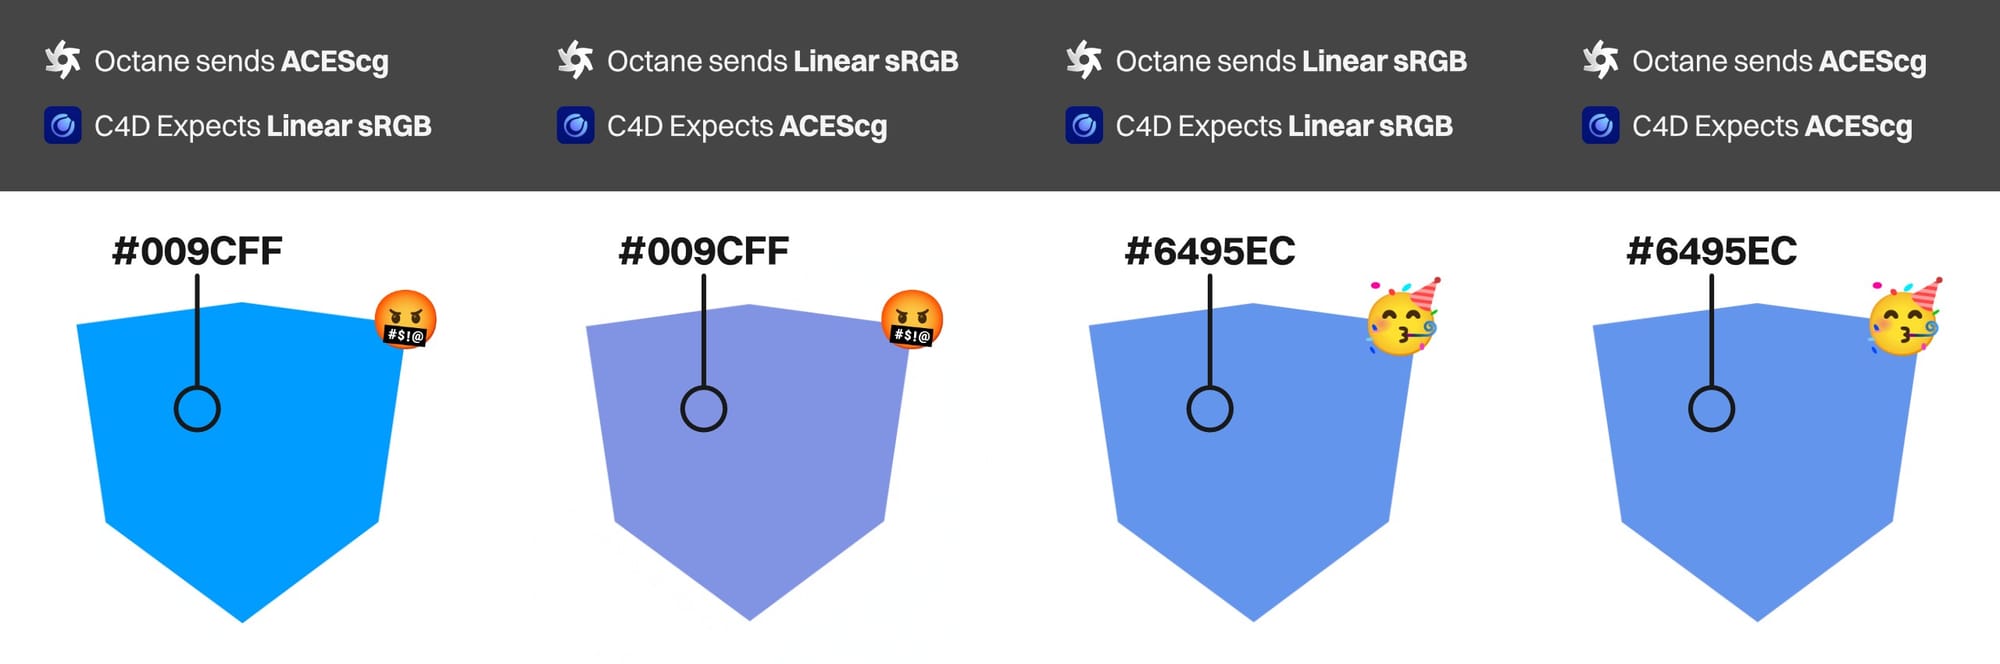
- If we’re going for ACEScg, we want to set both of these settings to ACEScg.
- If we’re using a Linear sRGB/BT.709 workflow, we want Octane set to Linear sRGB and C4D set to scene-linear Rec.709-sRGB. If we still need to use Legacy (sRGB Linear workflow) in C4D for some reason, then the match is also Linear sRGB in Octane.
Important: What we absolutely do NOT want here is for Octane to be set to sRGB (not Linear sRGB, just regular ol’ garden variety sRGB). Unfortunately that’s the default, but it will throw all our colors off. We’ll look at why we’d need to use this setting in a later part of the guide.
Just for this example, we’re going to pick ACEScg, since it’s the default in C4D and miraculously called the same thing in any two given places. This means leaving C4D’s Render Space at ACEScg, and changing Octane’s Picture Viewer Color Space dropdown to ACEScg.
Again, Linear sRGB would have worked just as well, but we need to pick one, so we’re going ACEScg today.
Step 2. Align the Tone Mapping
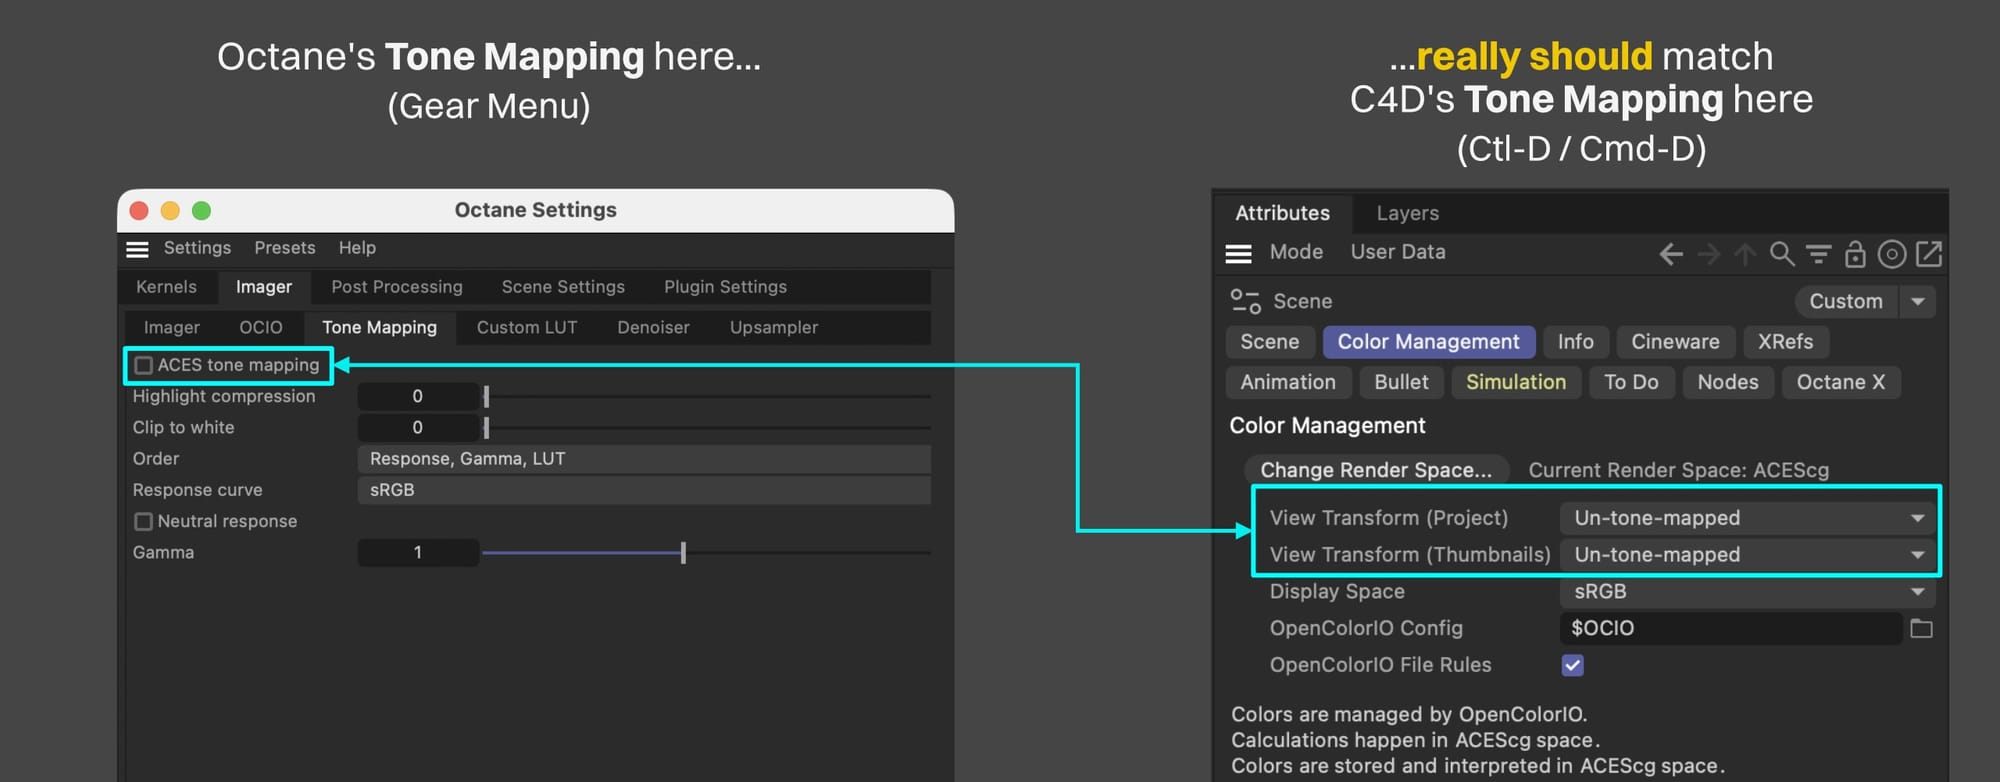
C4D’s tone mapping settings are in the same location as the display color space settings (Ctl-D / Cmd-D). It’s two settings though, View Transform (Project) and View Transform (Thumbnails). Project is the main one - that controls what we see in the C4D Viewports as well as what will eventually get used in the Picture Viewer. Thumbnails are for material thumbnails - why this is different is baffling, but we really just want to make sure they’re both the same.
Octane’s tone mapping settings are located in a few places. The main one is the decision to use ACES Tone mapping or not (“not” means straight sRGB in this case). AgX, smooth, and other OCIO setups are handled either in the OCIO tab or Octane’s Output AOVs (both out of scope for this guide).
Just like the working color space, we want to make sure these two systems are aligned, but mostly just to make sure what we’re seeing in the Live Viewer is what we’re also going to see in the Picture Viewer.
- If we don’t want tone mapping (straight sRGB), then C4D should be set to Un-tone-mapped in both View Transform Settings, and Octane should have the ACES tone mapping option unchecked. This will preserve our Cornflower Blue, but in projects where we’re worried about our lights blowing out, we’ll have to be a lot more careful.
- If we want ACES tone mapping, then C4D’s View Transform Settings should be set to ACES 1.0 SDR-video. ACES tone mapping should be on in Octane. This will shift our Cornflower Blue, but we’ll have more leeway with our lights and it’ll give it “that ACES look” that some people like. With the right masking, we can fix the color in a different post app if needed.
- If we’re after AgX or something else, a bunch more setup is needed that we’re not going to cover here. Our main goal in this series is preserve Cornflower Blue and follow it through this journey, so we’re going to pick Un-tone-mapped for C4D (in both View Transform places), and leave ACES Tone Mapping unchecked in Octane.
Step 3. Render to Picture Viewer
If we fire up the Octane Live Viewer, then we’re met with a #6495ED cube again, as expected.
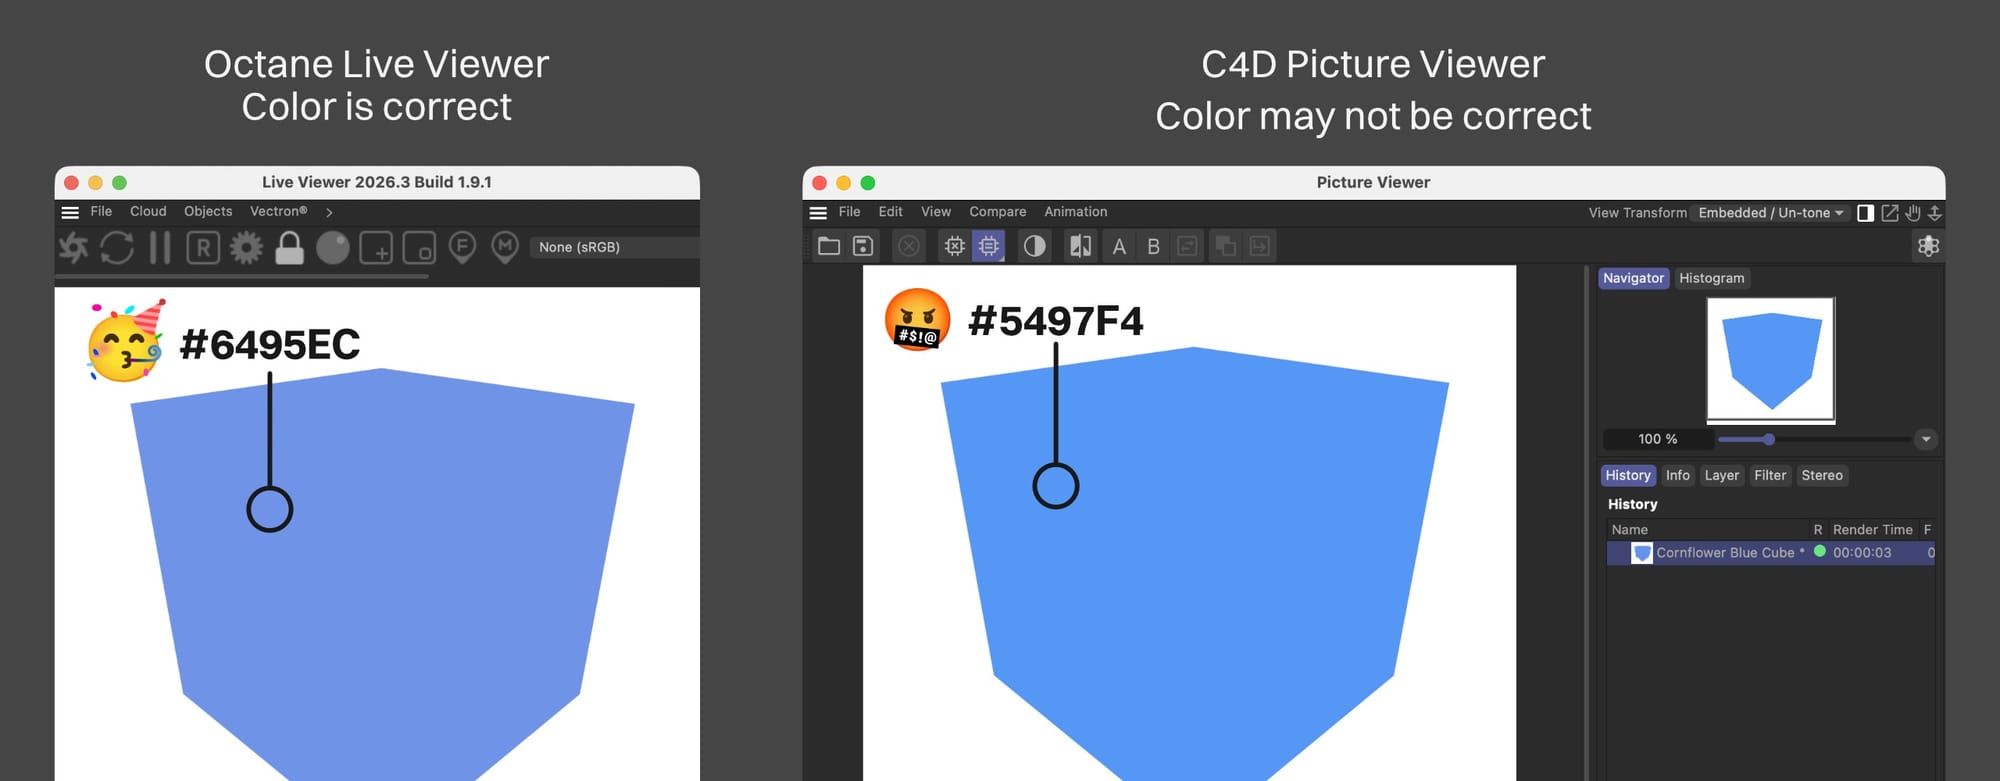
Now let’s try rendering to the Picture Viewer by hitting the little clapboard icon thing in the upper right of the C4D interface. At first blush, it may seem that this worked, and on some monitors it may well, but with a wide gamut screen like the one in the MacBook Pro the author is using, it’s once again a little off. A color picker shows that it’s really #5497F4, and that’s going to cause our cube to go into a tizzy.
Why. Oh why.
Step 4. Use Monitor Color Space
Right, because we learned in Book I of this epic crazy journey that C4D gives us the option to take our monitor’s color space into account. Octane automatically does this which is why it looks right in the Live Viewer, but C4D has it turned off by default for… y’know… reasons.
Let’s fix this.
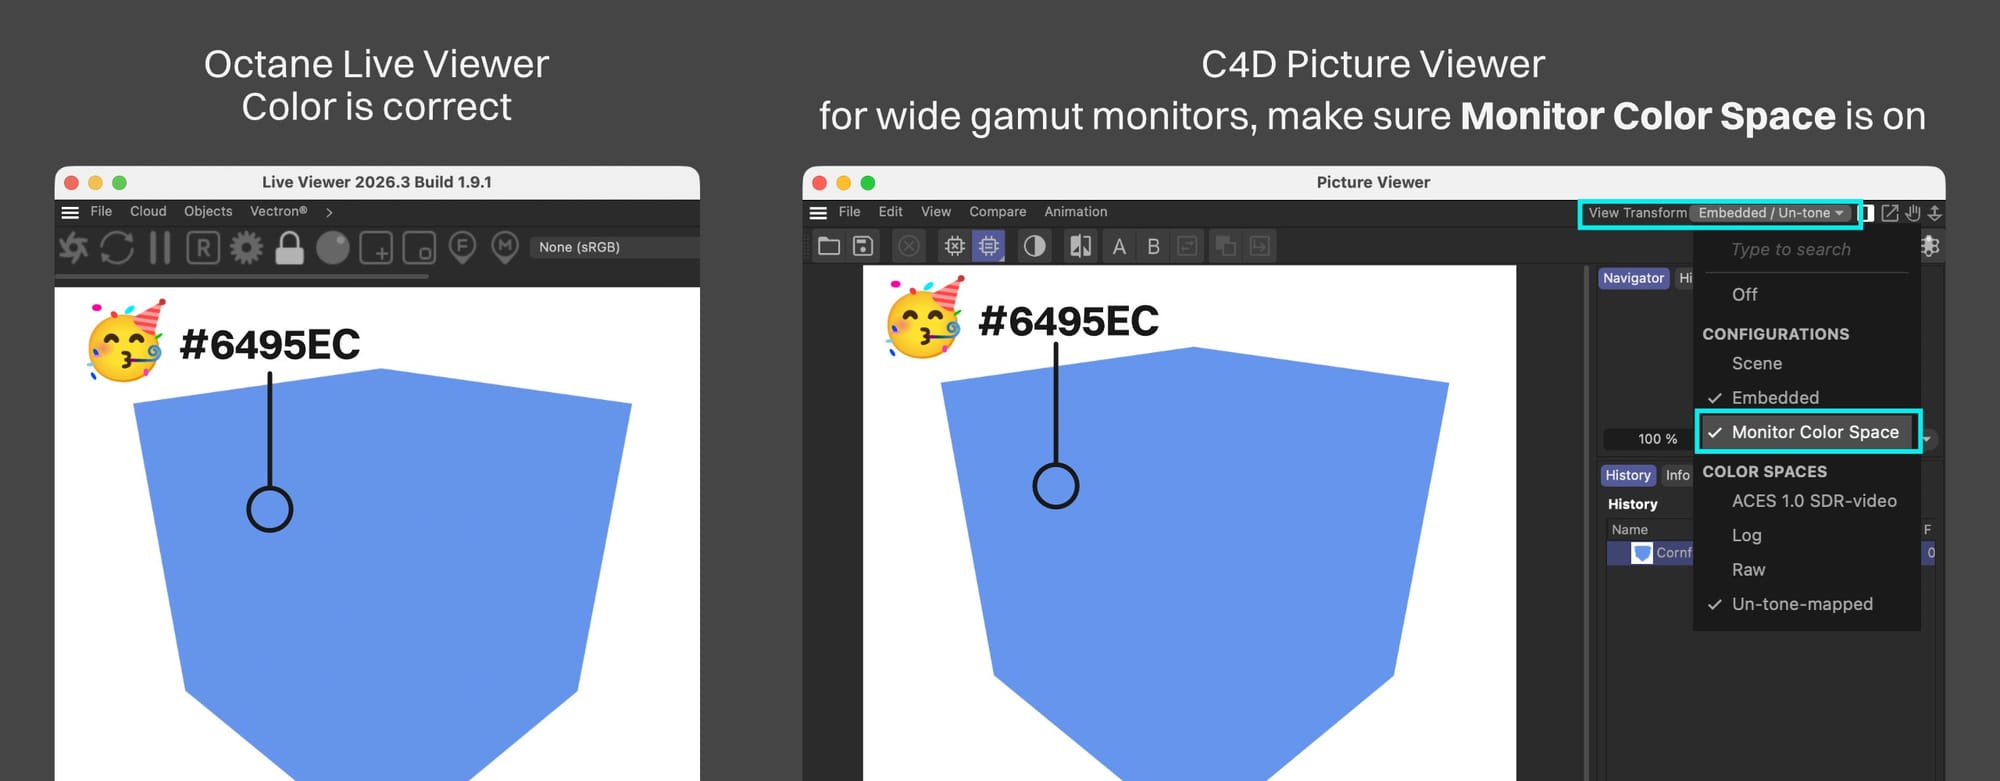
All of the Picture Viewer’s color space settings are in the View Transform dropdown in the upper right corner of its UI.
We can see that it pulled in the correct tone mapping (none) in the astonishingly irritatingly named “Color Spaces” section of the dropdown. (Maxon, if you’re reading this, please align all your terminology - this is confusing enough as it is).
We can also see that Configurations (?) is set to Embedded. We’re going to untangle this mess later in the guide, but for now we just need to know that it means that it’s using the settings we set in steps 1 and 2 of this section.
Finally, we can see that Monitor Color Space is off. Even if we somehow remembered that we could set this in the viewport settings (we probably didn’t), that setting doesn’t carry through to the Picture Viewer - we need to check it every time we use the Picture Viewer.
If our monitor is only capable of sRGB and isn’t wide gamut, then this doesn’t matter. If it is (and that’s most modern displays now), then this needs to be enabled so the colors look right.
Our cube can dance a jig now - it made it all the way through to the end.
Step 5. Post Work
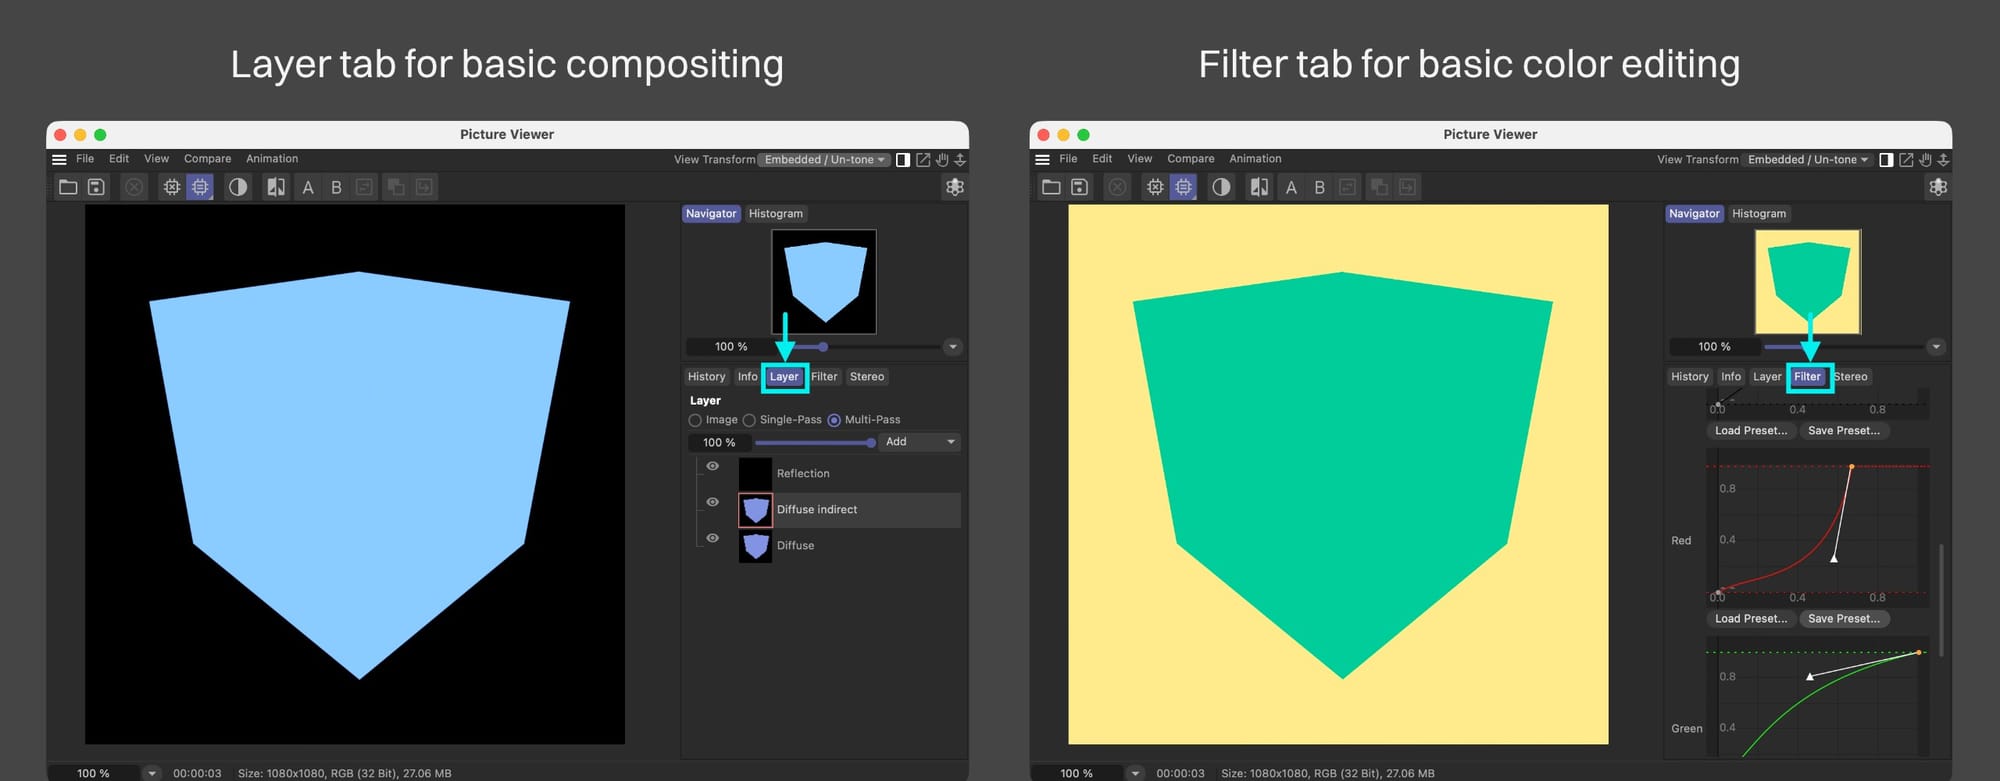
Why do we keep referring to the Picture Viewer as a post app?
Well, if we had multiple passes rendered out of Octane, those get pushed across to the Picture Viewer and we can do some super basic compositing work in the Layer tab.
Also, we can turn on Filter (?) in the Filter tab and do some rudimentary color correction/grading using some of the tools there, or just “make it pop” with extra saturation or contrast.
Why this is considered a true post processing workflow is that these edits are done BEFORE the view/output transform (converting it to sRGB/rec.709/etc and applying tone mapping). This means we get a TON more flexibility and we can push the values much further without breaking than we could if we just took a rendered PNG into an image/video editor and tried to do the same thing.
This same workflow is found in Nuke, Fusion, After Effects, and even Octane itself via Output AOVs, but we get a lot more control in those apps than we do here.
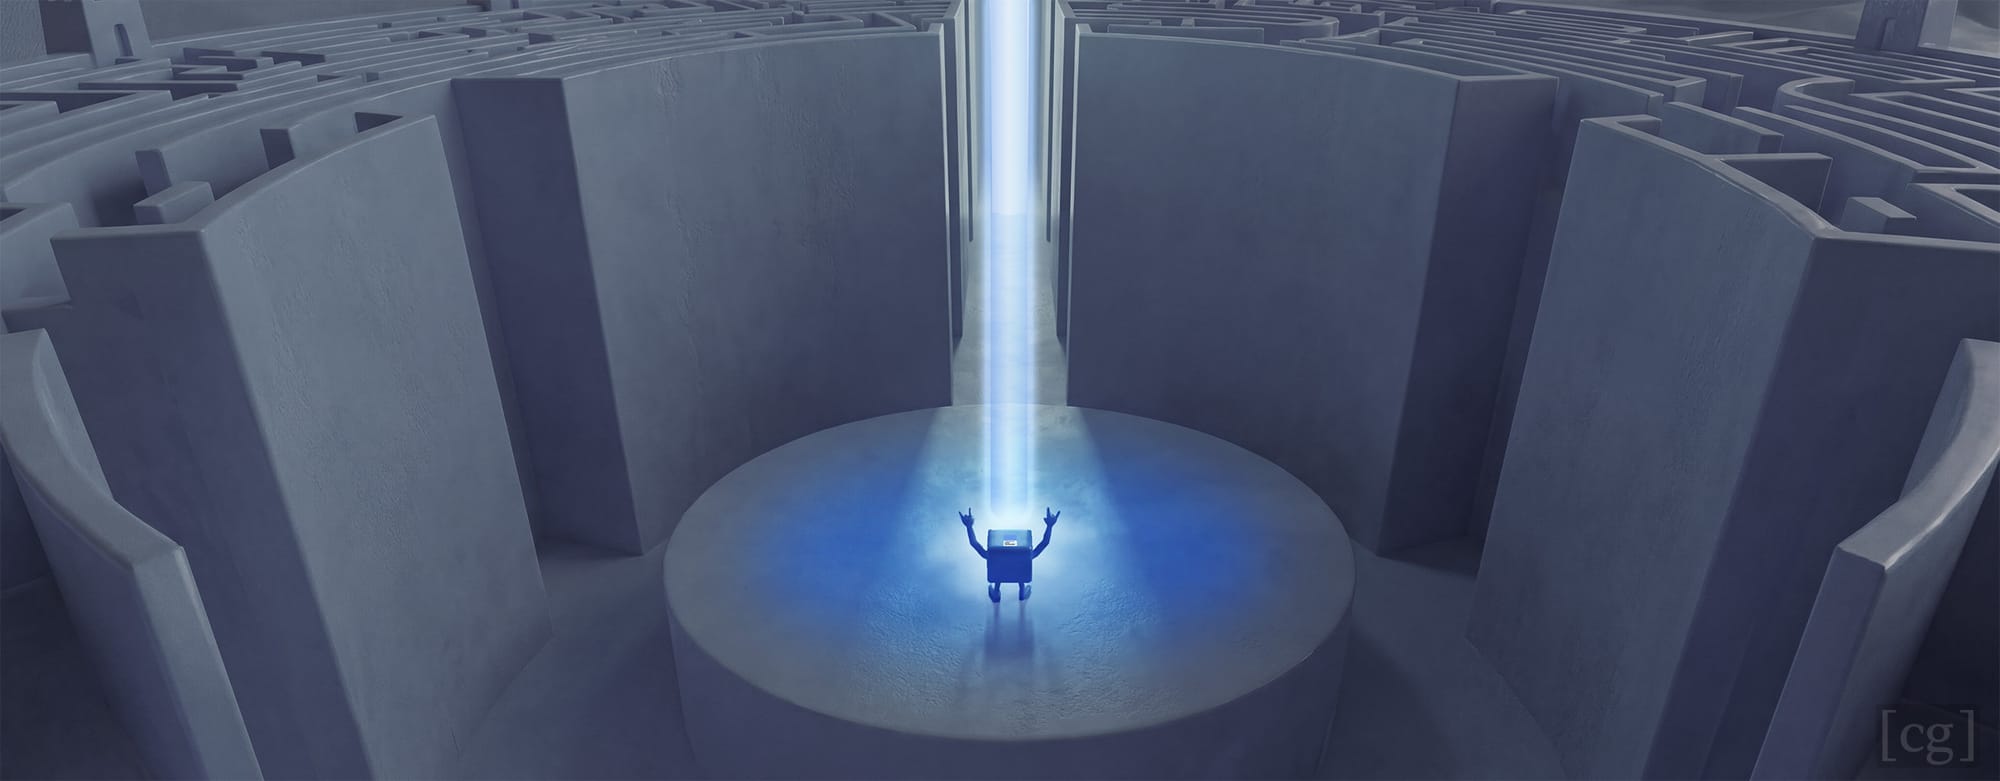
We Made It!
All the trials and tribulations we conquered led to our hero cube’s beloved Cornflower Blue identity being kept intact all the way from start to finish. Now it’s time to head back to the village with the character growth that only an epic adventure can bestow, and the knowledge that the power was within the whole time…
…or something.
The rest of this guide is going to focus on untangling the Picture Viewer’s crazy terminology. Feel free to skip it unless you’re curious or need to troubleshoot.
Part III: A Deeper Look into the Picture Viewer
This part of the guide is going to be more of a deep dive into the Picture Viewer to see what it’s actually doing.
We covered the basics in the last few parts, so none of this is going to be essential knowledge, but it’s interesting and useful if we need to troubleshoot a particular workflow.
Before we start, just know that it’s not us, it’s them.
OCIO
First off, a recap of what OCIO is:
OCIO (Open Color IO) is an open source color management system created by Sony Pictures Imageworks. It works with standardized (or custom) configuration files that have certain rules and specifications for handling color values. The theory goes that if two apps have correctly implemented it, and all the project files are referencing the same OCIO config file, the colors will all match. Sunshine and roses abound.
Cinema 4D uses OCIO for color management for internal calculations except when the Render Space is set to Legacy (sRGB Linear Workflow). This is the difference between the Legacy and scene-linear Rec.709-sRGB options. Both use the Linear sRGB/BT.709 working color space, but Legacy does not use OCIO, scene-linear rec.709-sRGB does.
Octane does not use OCIO for any internal calculations because it doesn’t need to. It calculates and renders spectral values, and there’s no standard color space for that. That doesn’t matter though because it can convert spectral values to any color space, and it fully supports OCIO if the export needs to abide by a specific OCIO profile.
The View Transform Menu

All of the Picture Viewer’s settings for color management are set in a dropdown in the upper right of the Picture Viewer called “View Transform”.
By the time the data gets to the Picture Viewer, it’s been rendered already, so this menu is just showing us what the PV is doing with our data.
Color Spaces section
Important: If we have the Legacy (sRGB linear workflow) Render Space option selected in C4D’s Color Management settings (Ctl-D/Cmd-D), we’ll only see a partial menu here that doesn’t have the Color Spaces section since it’s part of OCIO color management.
For all the other Render Space options, we get this extremely confusingly-named Color Spaces section. It really should be “Display” or “View” because it’s not referring to actual color spaces (those are things like ACEScg, sRGB, Linear sRGB, etc.) This section lets us choose some options for how the data is processed prior to viewing or exporting it.
- ACES 1.0 SDR-video applies ACES “Tone Mapping”, which is really ACES RRT+ODT. It’s the same as what Octane calls “ACES Tone Mapping”.
- Log is for video workflows, and out of scope for this series
- Raw means that it doesn’t do any processing at all, and treats this as a passthrough. If we feed in high bit depth data (Linear sRGB, ACEScg, ACES2065-1), then we’ll never see an accurate representation of the colors because we can’t - monitors don’t now and probably never will support 16- or 32-bit color.
If we feed in already-processed lower bit depth data (sRGB using ACES / AgX / Smooth tone mapping, etc.) This is the option we want to use so it doesn’t re-process it and completely jack up our render.
- Un-tone-mapped means it applies a straight sRGB transfer function without tone mapping. This is the same as what we see in Octane’s Live Viewer by default if we don’t have ACES Tone Mapping checked or any other tone mapping going in the Output AOVs.
Configurations Section
This should be called the “Color Space” section because it’s telling the Picture Viewer which color space to expect. We learned earlier that we get mismatches and all kinds of pain and suffering if the post app is expecting one color space and getting another.
Well, this menu seeks to resolve that in a way that… idk… makes sense to someone?
Unfortunately it’s not as cut-and-dry as simply picking the color space from a list, or better yet just having it autodetect it.
No, that would be too easy.
Metadata
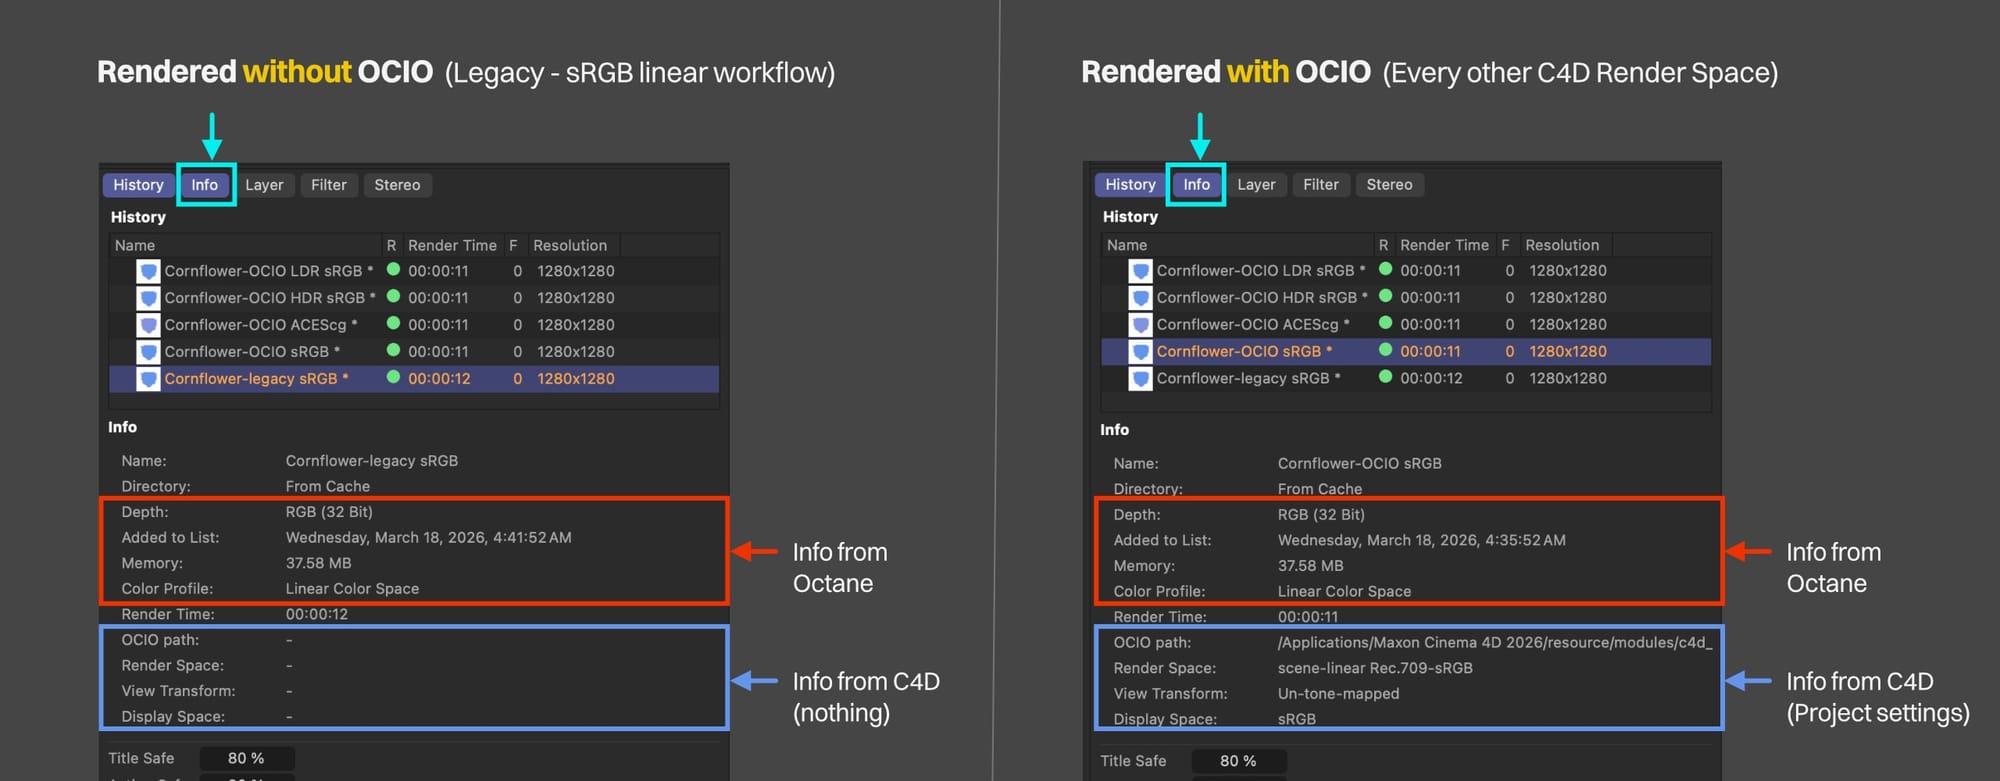
When Octane sends data to store in the cache, C4D tags it with metadata. We can see this in the Picture Viewer when we select a render and go to the Info tab. If we highlight both the History and Info tabs, we can thumb through the renders to see the metadata for each one as seen in the illustration above.
This metadata includes some super basic info from the original render data (what was sent from Octane), and some more detailed info from its own Scene Settings (Ctl-D / Cmd-D > Color Management).
If we picked Legacy (sRGB Linear Workflow) as our C4D Render space (which we now know doesn’t use OCIO), there’s no OCIO metadata to record. If we picked anything else, it records some stuff from the Scene Settings.
Info from Octane
Important: During the Render to Picture Viewer process, C4D looks at the incoming data from Octane and only knows whether it was encoded in a linear (32-bit) or non-linear (8-bit) fashion. It doesn’t have any way of knowing which color space is that we picked.
If Octane was set to sRGB (not linear sRGB), then it sends non-linear encoded values over (regardless of whether HDR or LDR was chosen). C4D assumes this is using the sRGB color space (it is) and stores the color profile as sRGB IEC61966-2.1. It then proceeds to display it incorrectly on a non-sRGB monitor. Whee.
If Octane was set to anything else (ACEScg, ACES-2065.1 Linear sRGB, etc), then it sends 32-bit linear-encoded values. C4D records this as “Linear Color Space” regardless of the actual color space used. The values are the values, and they’re correct, C4D just isn’t aware of the color space from Octane so it uses a generic term.
Info from C4D
If we’re using OCIO in C4D (we probably just should be at this point now that we know we can get our colors to match), Render to Picture Viewer also records the C4D Render Space, Display Transform, and Display Space from the Ctl-D/Cmd-D Scene Settings in the Color Management tab, and we can see that at the bottom of the Info tab section in the Picture Viewer (blue outlined stuff in the illustration above).
Ok, so now we know what all it records, how does it use it?
Scene and Embedded options
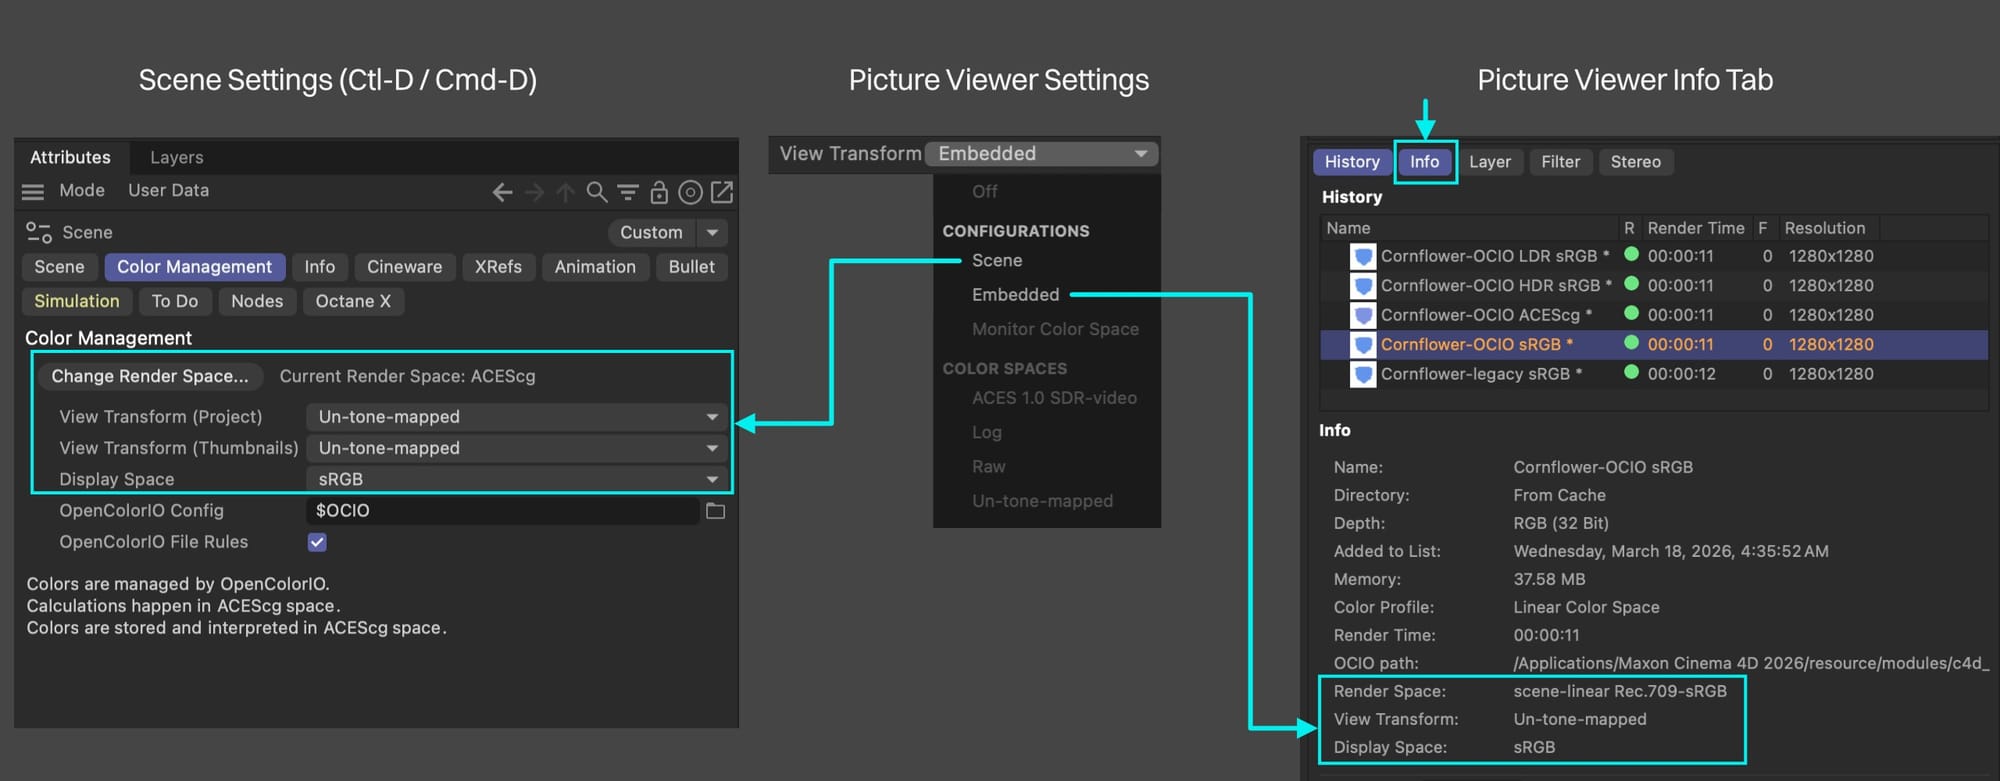
Back to the Configurations section of the View Transform menu, we have these two options - Scene and Embedded - that we can pick from that tell the Picture Viewer what the color space and view transform should be.
Ready for some UX-fueled rage?
Important: (Mentioned before, relevant now): The Picture Viewer does not know what color space the data Octane sent is encoded in. We have to let the Picture Viewer know by way of C4D’s “Render Space” setting in the Scene Settings. We have two ways of doing this:
Scene
Scene ignores the embedded metadata and uses the settings that are currently set in the Scene Settings (Ctl-D / Cmd-D) under the Color Management tab right now.
It uses the “Render Space” as the working color space (ACEScg / ACES2065-1 / any of the scene-linears), and stays synchronized with that.
Important: This means if we’re working on a different project and go back to the Picture Viewer to do some post on an old render with the Scene configuration set, it’ll use the working color space that we are using in our current project which may be different from the one in our new scene (and will hose the colors).
It also does a one-time pull of the “View Transform (Project)” setting in the Scene Settings to populate its (sigh) Color Spaces section. So if the View Transform in the Scene Settings is set to Raw, it will switch the View Transform menu in the Picture Viewer’s option to Raw.
Once.
If we start messing around with the View Transform in the Color Management settings and cycle it a few times and land it on un-tone-mapped, it will not update in the View Transform menu in the Picture Viewer…
…unless we choose Embedded and then switch back to Scene. Then it will update it.
We can also manually choose the View Transforms if we want and they’ll stay there until we pick Scene again and then it’ll change on us again.
So yeah.
Embedded
This isn’t any better.
Embedded uses the stored metadata in the render itself (that we just learned about) to specify the color space the Picture Viewer assumes when doing its processing.
Important: The actual color space (what the Scene Settings Calls “Render Space”) is taken from the Scene Settings at the time of render and recorded into the metadata. It can not be changed. If we had it set wrong during the render, we can’t use the Embedded config, we need to go back to the Scene configuration and set it in the Scene Settings so that it picks it up.
The view transform (what the Picture viewer calls “Color Space” 😡) is also taken from the Scene Settings at the time of render, but instead of hardwiring it, it uses it to change the option in the Color Spaces section of the View Transform menu to whatever was stored. This also works like the Scene option where we can override it, but if we toggle away from Embedded and back to it, it’ll change it again.
So yeah.
Monitor Color Space
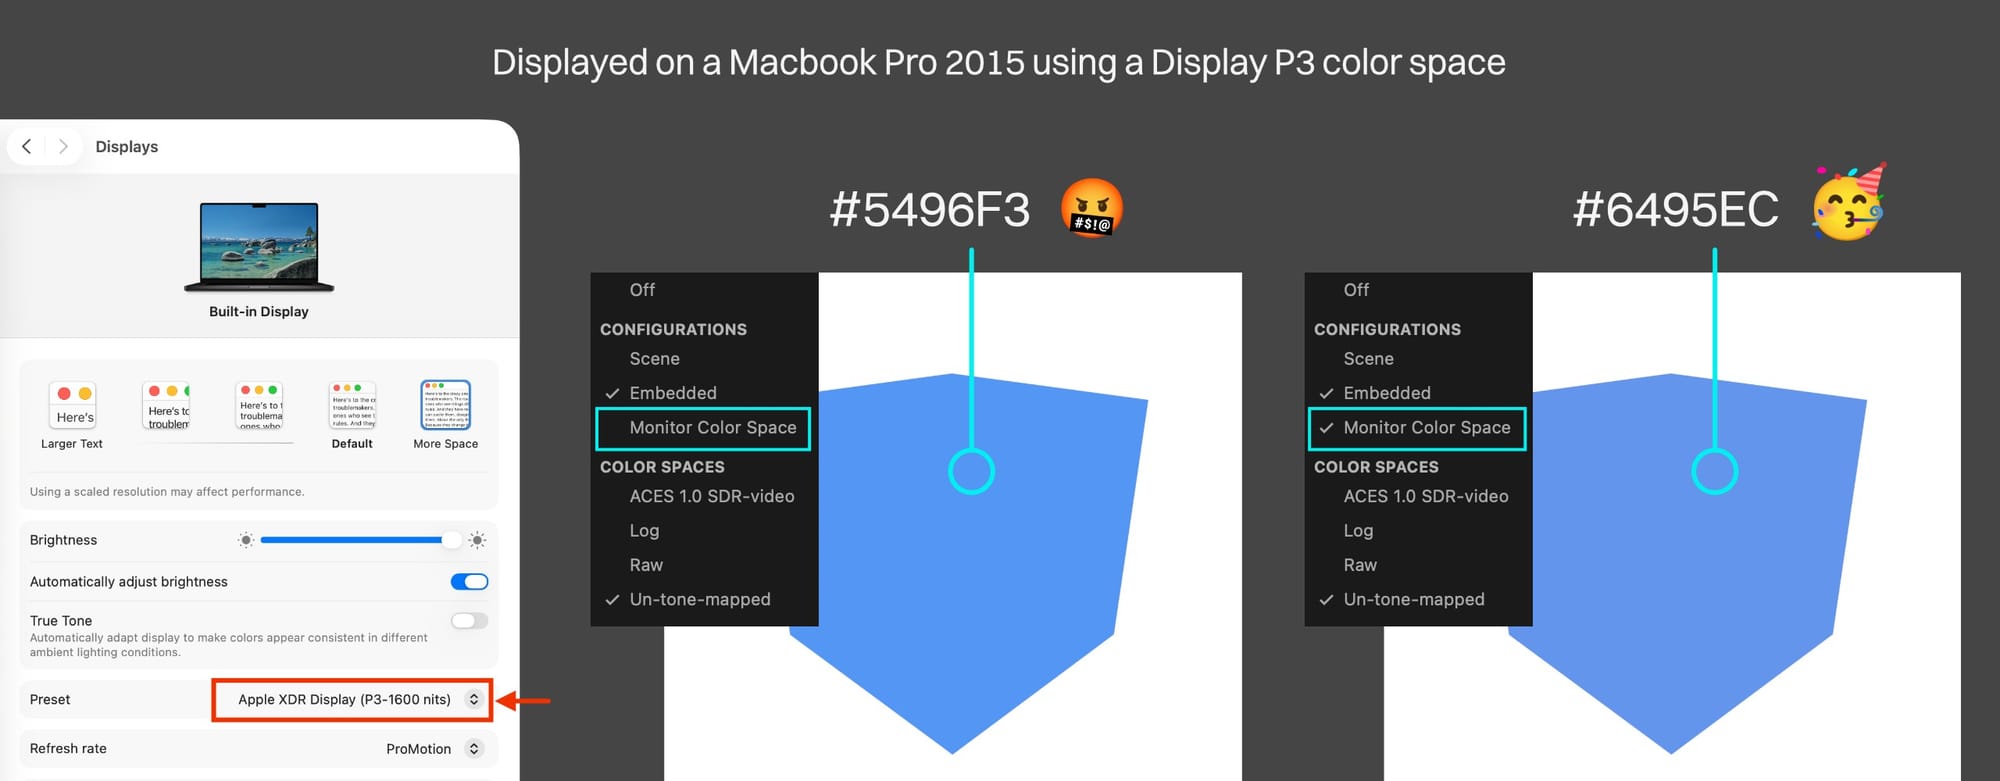
We looked at this before, but for the sake of completeness, we’ll look at it again here. Monitor Color Space is the last option in the Configurations section, and it’s an on-off toggle.
If we’re using a “wide gamut” or “HDR” or really any non straight-up sRGB monitor (many of us likely are now), we need C4D to be aware of this and take it into consideration when displaying our render in the Picture Viewer. If we still are just using an sRGB setup, turning on this option is a good habit to get into for later when we’re using a different system.
To do this, we just need to make sure Monitor Color Space is CHECKED in the View Transform dropdown. Annoyingly, this option is turned off by default and doesn’t come over with the render metadata, so we’re always going to have to be checking it.
Important: The Monitor Color space option only works if the View Transform is set to either Scene or Embedded, and then only if it’s set to ACES, Log, or Un-tone-mapped. It does NOT work if it’s set to Raw or Off, which are the only two settings that properly display incoming sRGB-encoded data.
Quick Note About sRGB
Important: If we have Octane’s color space in the Picture Viewer tab set to sRGB (default, and what we’d want to use if we’re exporting a PNG or JPEG sequence directly), then the image in the Picture Viewer is never going to be correct no matter how many options we set if we have a display that’s not set to sRGB (This Mac’s Display P3 screen for example).
It’ll render just fine, but it just won’t display properly in the Picture Viewer. The only solution if we want the colors to match in this scenario (as of this writing) is to change the color space of our monitor to sRGB.
Journey recap
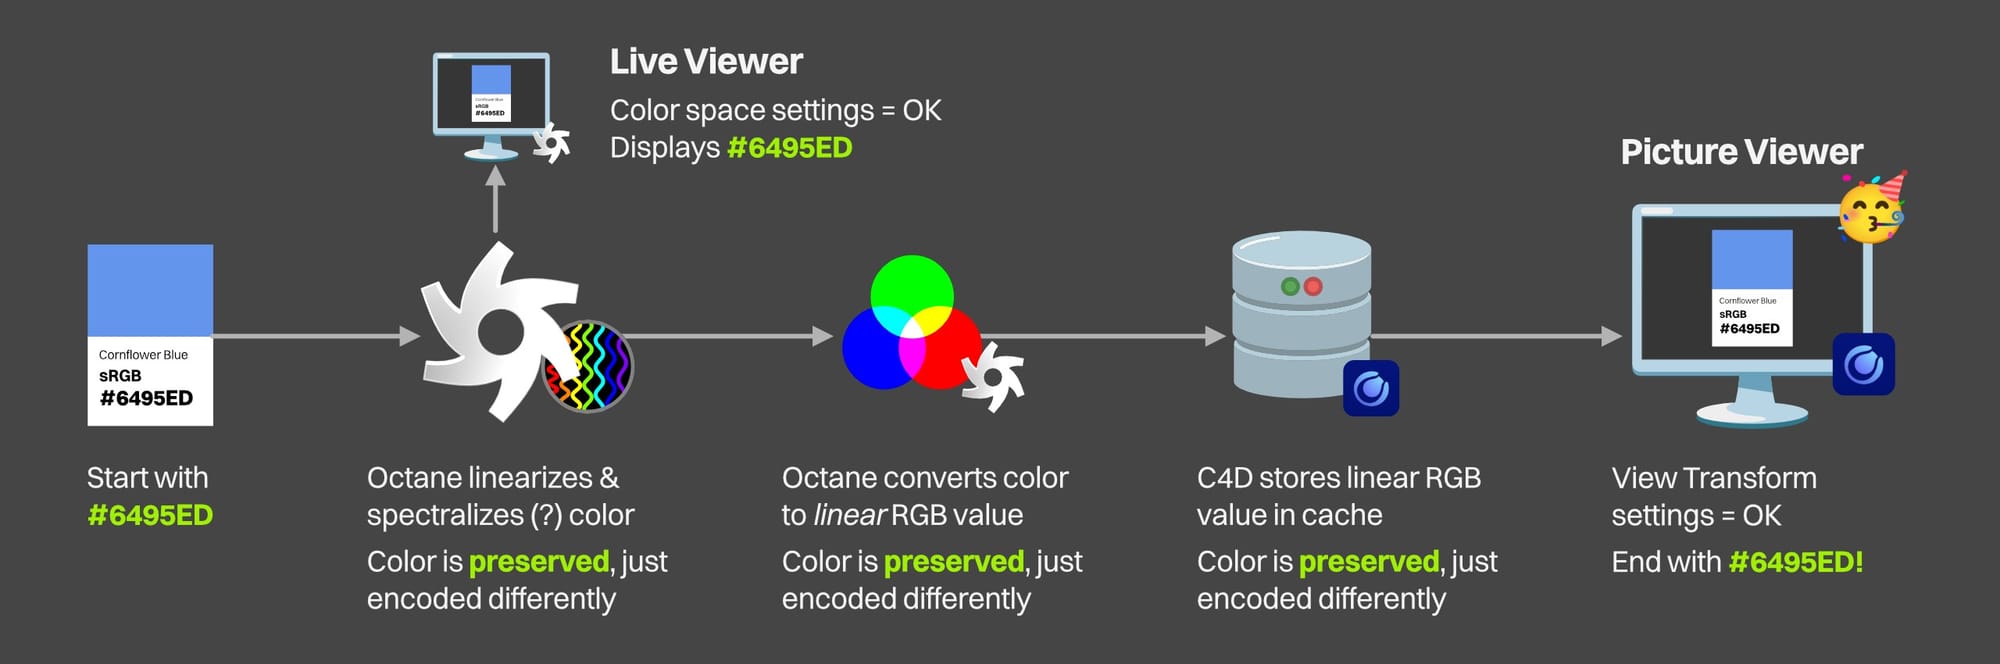
We finally have all the pieces of the puzzle. Let’s see how this journey plays out in fast forward:
- We start with our Cornflower Blue #6495ED. We learned in Part I how to get the color picker to enter this correctly.
- We then hit render in the Octane Live Viewer to check our work. Octane converts the Cornflower Blue into spectral data which re-encodes it, but preserves the integrity of it. It then converts it back to sRGB and displays it properly in the Live Viewer while we’re working with our scene (assuming we don’t have ACES or any other tone mapping set up). So far so good.
- We then tell Octane which color space we want to use when sending data to C4D in the Render Settings > OctaneRender > Picture Viewer tab. This can either be ACEScg or Linear sRGB unless we’re doing some custom OCIO thing, or are using ACES2065-1 for some reason. This can be sRGB if we’re rendering PNG or JPEG, but the PV won’t display the correct colors unless our monitor is also set to sRGB.
- We then hit Render to Picture Viewer. If C4D’s Save section was on and a path was specified, we’ll get a file saved in a way that we specified in Book I.
If Octane’s Save settings in the C4D Render Settings > Octane Render > Render AOV Manager settings were set up like in Book II, we’ll get a file saved.
If neither of those were on, the process will still start, but we won’t get any saved files, just cached ones.
- Octane once again starts a render which converts Cornflower Blue to spectral data, but then immediately converts it again to an RGB value using the color space we told it (still preserving the integrity of the color), and sends it over to C4D which caches it.
- C4D tags it with “Linear Color Space”, and also records its current Render Space (ACEScg, scene-linear rec.709-sRGB, or Legacy). If it’s an OCIO one (not Legacy), then it records the View Transform (Project), Display Space (we didn’t talk about that but don’t need to unless we have some custom OCIO thing going on), and path to the OCIO Config file it used. The color is preserved, but the render has some metadata attached to it now.
- The Picture Viewer picks up this hunk of data and uses the Embedded configuration option in the View Transform dropdown to display an image. We need to make sure the settings are right: If the C4D Render Space matched Octane’s Color Space setting at the time of render, we’re golden. If not, we can set the Configuration Setting to Scene and use the settings in Ctl-D / Cmd-D > Color Management > Change Render Space to match the color space Octane sent.
If the View Transform (Project) option in the C4D Scene settings was set to Un-tone-mapped at the time of render, then we’re nearly there. If it was set to anything else, we can manually change it to Un-tone-mapped now.
The Monitor Color Space option in the View Transform defaults to off, but needs to be on if we’re using a wide gamut (non-sRGB) display.
- So with all this set up correctly, the Picture Viewer takes the linear-encoded values from the cache, applies an sRGB transfer function to it, doesn’t do any additional tone mapping, takes our monitor’s space into consideration when displaying the values, and voila - we end up with #6495ED. Our hero cube is pleased.
Phew.
This same workflow can be used with any post app, so it’s worth going through. It’ll also get easier as we get presets going and just pick one working color space to use (ACEScg, Linear sRGB, or some custom OCIO setup).
Wrap Up
If you made it this far, congratulations. Color spaces as a concept really is a big hairy mess, but hopefully you have a better understanding of how to navigate it now. You should have some ideas of where to start looking if your colors don’t match, and then can likely follow other parts of this guide to understand what to change.
Author Notes
This guide originally appeared on www.contextualguides.com and https://help.otoy.com/hc/en-us/categories/201718003-OctaneRender-Support-Guides
The written guide may be distributed freely and can be used for personal or professional training, but not modified or sold. The assets distributed within this guide are either generated specifically for this guide and released as CC0, or sourced from CC0 sites unless otherwise noted and attributed.
© 2026 Scott Benson, All rights reserved.