A Hex Value's Journey: Book II - Octane
This is the second part of a multi-guide series that follows a single color through a color management journey. This one focuses on Octane.

About this guide
Version 1. Created using Octane 2026.2.
This is part of a multi-guide series that follows a single color through a color management journey. It’s written as more of a story than a factual how-to guide to hopefully make it more interesting, palatable, and memorable.
This second book covers Octane for Cinema 4D 2026.2, using the 1.8.4 or later build
If you haven’t read Book I: C4D, it’s highly recommended even though it hasn’t made the New York Times Bestseller list (yet?).
This guide is also available in 📄 PDF format here
Intro
This is a continuation of a series where we follow a hero cube through a wild and treacherous journey of color management in a quest to keep his signature Cornflower Blue color (#6495ED) intact and unaltered.
Book Icovered the Cinema 4D part. Now we’re going to go deeper and see how Octane Render interacts with C4D and what needs to be done to keep our colors consistent.
Part I: The Octane Live Viewer|I. Live Viewer
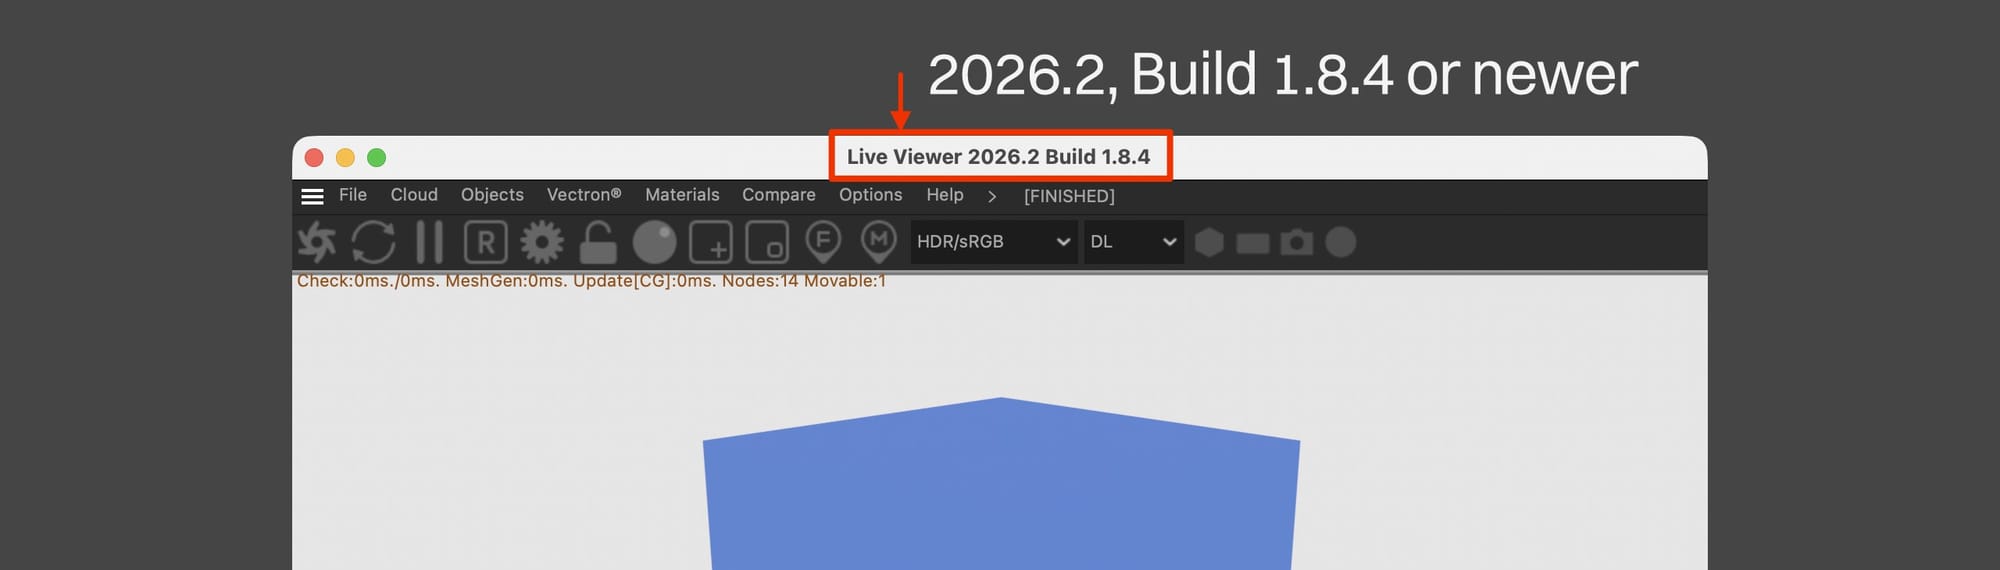
Before we even go any further, we need to make sure we’re on build 1.8.4 (or newer) of the Octane plugin. Prior to 1.8.4, color management was total hell. Now it’s partial hell. We can check this by undocking the Live Viewer and looking in its titlebar.
If we’re not on Octane 2026.2, Build 1.8.4 or newer, we can head over to the Otoy Downloads page and remedy this.
Note: We’re going to assume that this is a fresh, default install of Octane. If things are a little different, it may be a custom setting that you set way back when you first installed Octane (they travel from version to version).
Octane’s Working Color Space
With C4D and most render engines, we have to specify a working color space. As we saw earlier, C4D now defaults to ACEScg, as does Redshift.
Octane’s internal color space isn’t a standard one (or one we can choose) - it uses spectral values for its calculations instead of RGB ones. This system emulates light spectra, and is part of what gives it its signature photographic look. It covers the entirety of the visible spectrum, and the rendered values are 32-bit and stored in a linear fashion, so they can easily convert to ACEScg, Linear sRGB/BT.709, or even ACES2065-1 when we need to export high bit depth “source files” for post.
All this to say we don’t need to, can’t, and shouldn’t worry about having to pick Octane’s internal working color space like we do with C4D.
Cornflower Blue is perfectly safe to transfer to the spectral realm and back.
The Live Viewer’s Display Space
As of this writing, the Live Viewer itself can only display 8-bit sRGB values. It can’t (yet?) display 10- or 12-bit Display/DCI P3, and it certainly can’t (and will never be able to) display 16- or 32-bit linear-encoded working space files (no app/hardware will).
This means if we’re working with scenes meant for HDR mastering and the like, we’ll still only see an 8-bit preview of them in the Live Viewer and will need to send them out to a post app to see the final look.
Octane also already takes the monitor’s color space into consideration, so there’s no need to manually set that (cough C4D cough). The colors will just look right.
Cornflower Blue in Octane
Let’s make a new Octane material. Any type will do, but we’re going to use a Diffuse material so we don’t have to adjust any extra channel settings.
When we go to the Albedo channel (used to be called the Color channel, but all the channel names were recently aligned - 🙏 devs!!), we’ll see something unexpected if this is a brand new install - the color picker will only have R, G, and B sliders with a 0-1 range.
This is Octane’s linear RGB model. It’s great for some things, but confusing to longer term C4D users coming from other engines. In this exercise, we’re going to change it.
If we go into the Octane Settings (gear icon in the Live Viewer), into the Settings tab and Other subtab, we’ll see the option about halfway down to change the Color GUI type from Octane Native to Cinema 4D native. Let’s do this and hit apply.
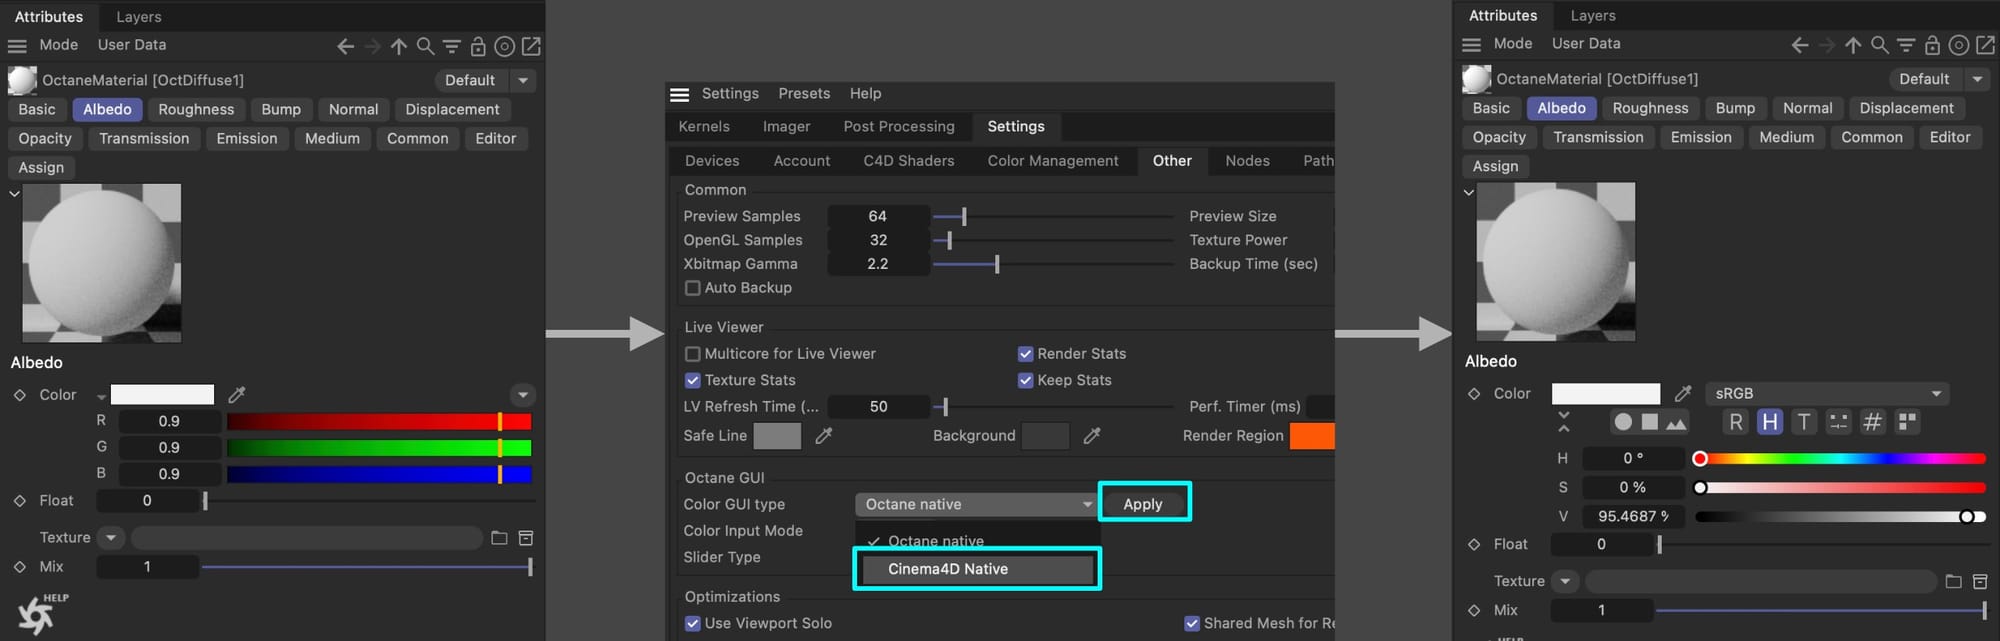
Now when we click away from the material and click back in to refresh the Attributes manager, we’ll see the C4D picker we’ve been using.
Let’s add in our color (#6495ED ) in Albedo using the hex model, and replacing the standard blue material we were using with this new Diffuse material.
Important: This will work for any Octane material type with an Albedo/Diffuse/Base Color channel (they all mean the same thing, just different phrasing for different material types) with default settings EXCEPT Standard Surface. Standard Surface’s Base Layer defaults to 80% contribution, so EVERY color put directly into the internal color picker for this material type will be dark. This gets overridden when an external node is attached to the channel (and will display fine once the weight is brought back up to 1), but this is a gotcha that’s worth being aware of.
Let’s hit the Send Scene and Render button in the LV button bar (looks like an Octane logo). If we use a system color sampler tool like the built-in Digital Color Meter on the Mac or the Snipping Tool / Color Picker in PowerToys on Windows, we’ll see it’s… drumroll please… #5A85D5!, not #6495ED like we’re expecting.
But, but… it was easy they said…, no need to account for monitor colors, they said..
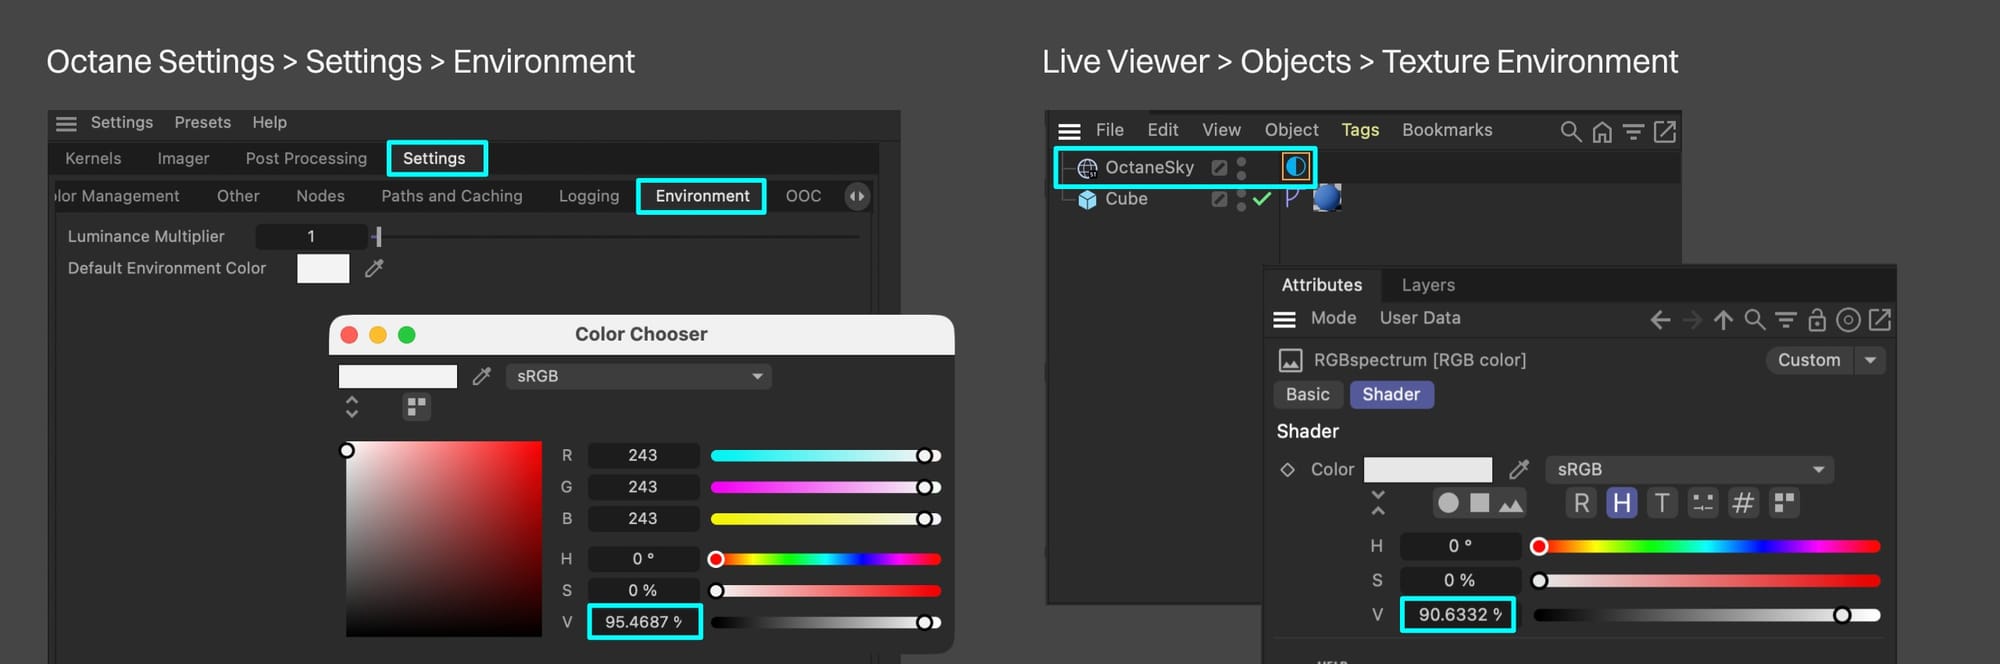
Turns out it’s because Octane has a default environment lighting the scene, and it’s not 100% white by default (it’s 95ish%). This means we’re shining a slightly dim light on it, so when it renders, it’s rendering slightly dim.
We can remedy this temporarily by making a new Texture Environment and changing change the color to H:0, S:0, V:100, or #FFFFFF if we’re using hex.
Excellent, now our cube can come out of the shadows and once again shine in all its #6495ED glory in the Live Viewer! woo :)
…well, some of the pixels do, anyway.
Max samples
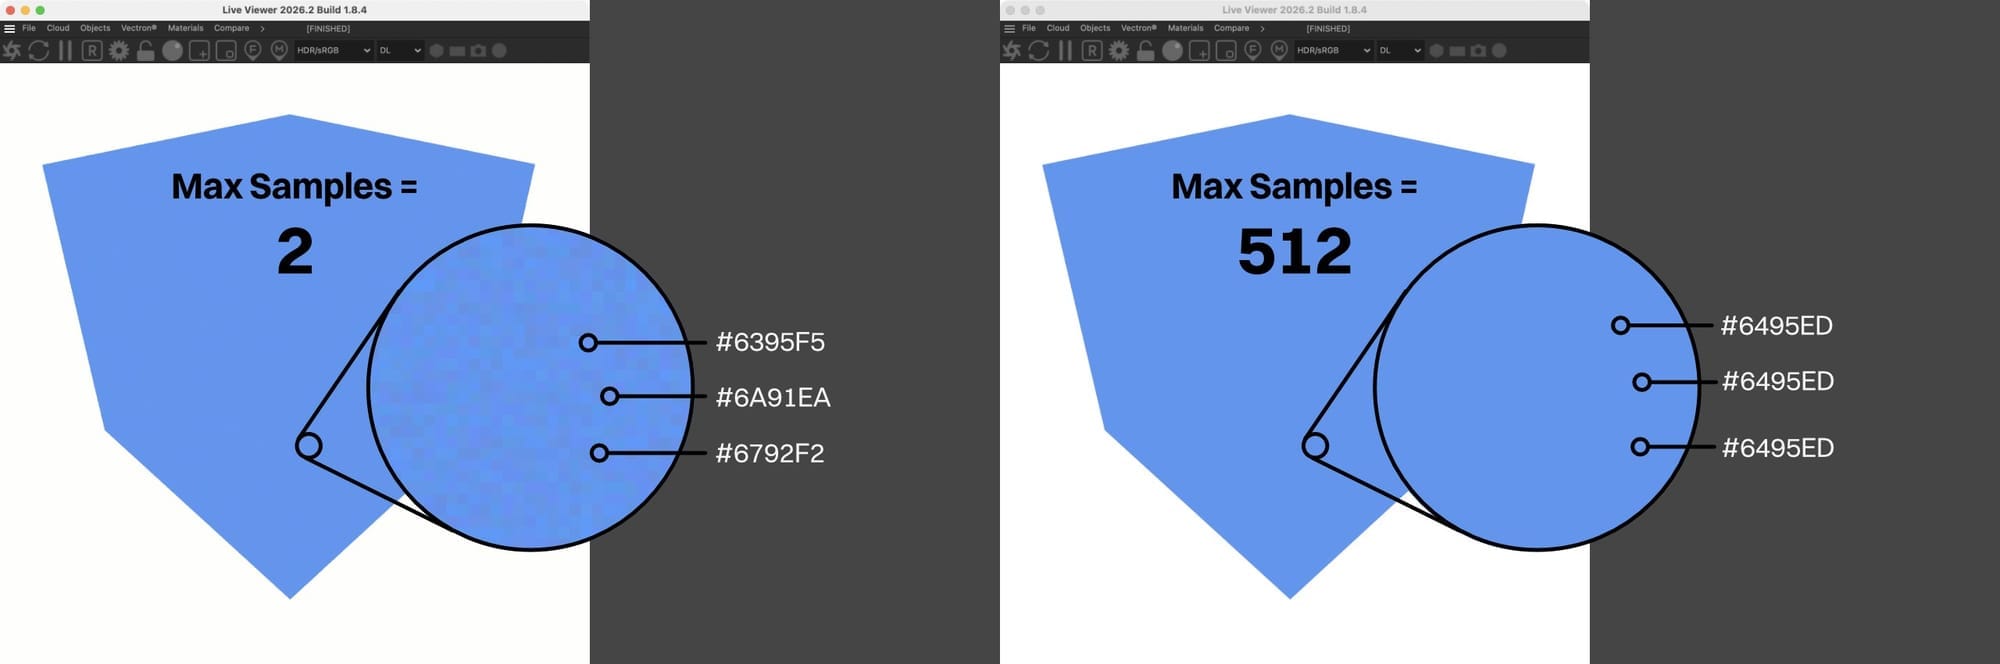
Octane progressively renders each pixel. When it first starts, it very quickly sketches out an estimation of the final state of each pixel. These first few samples are really rough and inaccurate by themselves.
As we can see above (after zooming way in), at 2 samples, few if any pixels are actually #6495ED. When zoomed out, they visually munge together and average out and look about right, though.
After Octane progressively goes over the whole image several times, each pixel resolves more and more until either we or the engine decide that that particular pixel is “done”.
In this case, it took about 512 samples to fully resolve every pixel in the cube, and nearly all of them are now #6495ED. There may be a stray here and there, but the bulk of the field will be correct.
Tone Mapping in Octane
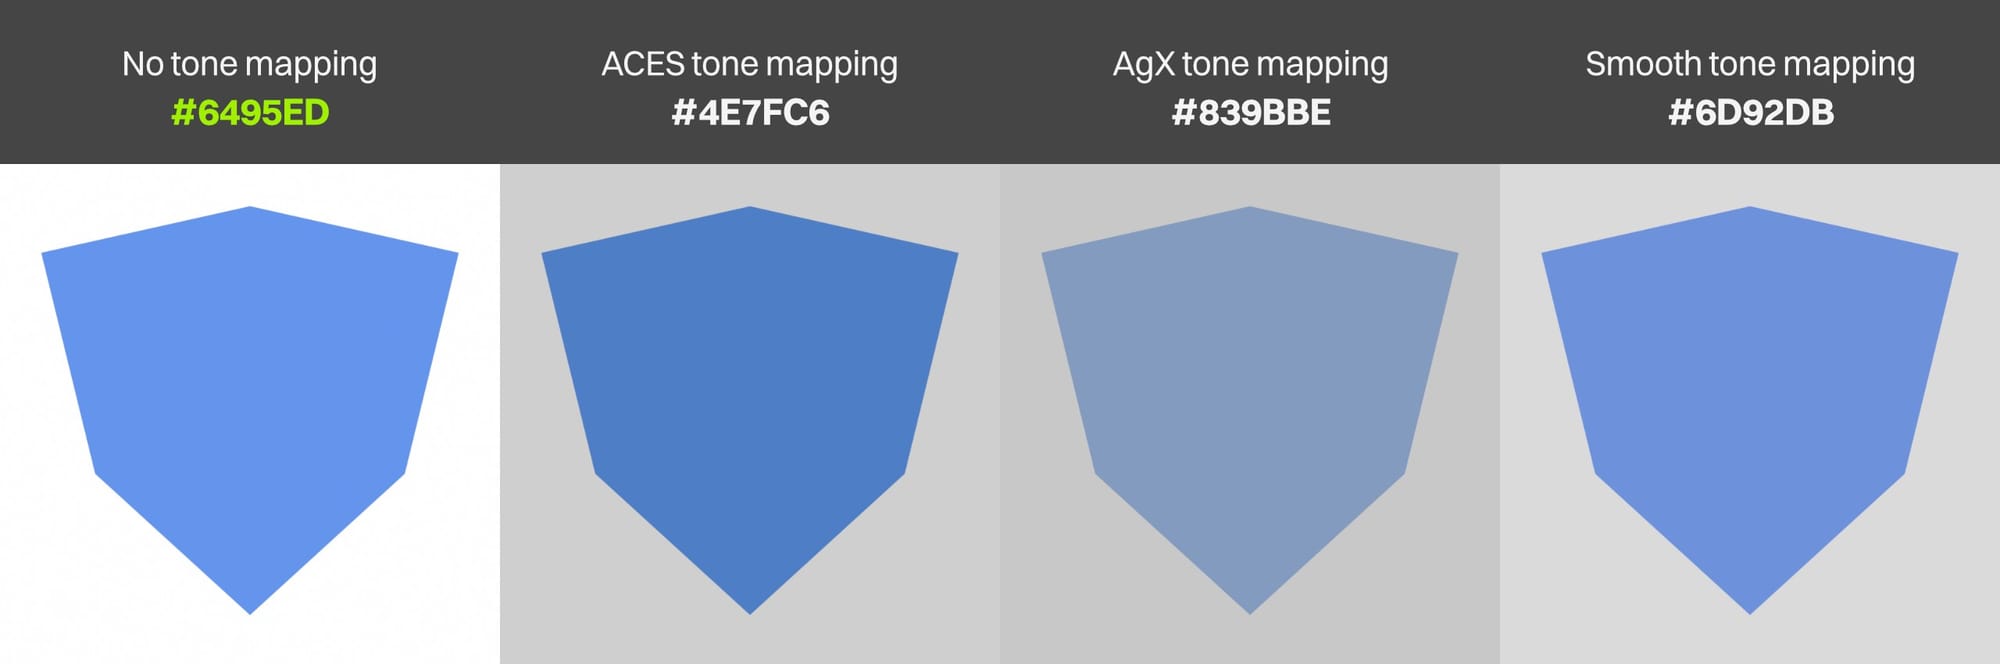
As we just saw, the Live Viewer matched the C4D un-tone-mapped Display Transform in the viewport. That’s because Octane defaults to no tone mapping (straight sRGB transfer function).
If we want, we can go into the settings and apply ACES Tone Mapping which would shift all our colors (because that’s what tone mapping does), and this would match the ACES 1.0-video Display Transform in C4D’s viewport if we had it set that way. Octane also has AgX and its own “Smooth” tone mapping options in the AOVs, or we can set up OCIO for other more advanced color space workflows.
Why would we want to do this if it shifts our colors? Well, if we’re just making a solid no-shading icon like this cube for a brand or a particularly fussy cube that really loves its color, we wouldn’t.
If we were rendering something more photographic with a ton of dynamic range that goes out beyond the bounds of sRGB, then we’d use it to wrangle in the values to get a better representation of all the data we generated, and avoid issues like blown highlights and banding.
Important: Any and all tone mapping would require fixing the final render in post somehow to maintain our Cornflower Blue color (#6495ED) exactly.
Because in this exercise we’re trying to track a single color through the system, we aren’t interested in shifting and are just going to leave it at the default.
C4D Viewport Colors
The various Octane material types interact slightly differently with the C4D viewport (they differ both from the native C4D material and from each other).
Even when set up properly though, a solid color in the Albedo channel of an Octane material will never show correctly in the Live Viewer if the display is set to anything other than sRGB (even if the C4D viewport is set to Constant).
It will get closer, and sometimes even match if the material has the albedo and specular channels set to black and a texture emission set to white, power 1, surface brightness on.
Any bump and normal contribution will affect the C4D viewport even if it’s set to Constant mode (C4D native materials do not).
The Roughness channel affects the viewport in the Diffuse material, but not Universal or Standard Surface. Standard Surface’s Diffuse Roughness does affect the viewport color. Standard’s Surface’s base layer also defaults to 0.8 contribution, so any color dropped in will be dark unless that’s cranked to 1.
All this to say, don’t trust the viewport with Octane materials, and use C4D Standard materials if you want to do a viewport playblast and keep accurate colors for some reason.
Nerd stuff
Quick note here if you’re interested in looking under the hood more, otherwise feel free to skip this bit.
Very few (if any?) DCCs work directly with spectral values so they can pass them to Octane, therefore Octane is set up to expect Linear sRGB/BT.709 values and has its own conversion system to go back and forth.
This expectation also means that Octane needs to convert any other color space like ACEScg to Linear sRGB/BT.709 as an intermediate step prior to the final conversion to spectral before rendering.
Important: While it seems like more conversions would worsen the overall system, we have an ace (well, multiple ACES) up our sleeves here, and that’s the concept of linear encoding. Linear encoding allows a space like Linear sRGB to exceed the normal 0-1 range that defines its gamut, so nothing gets clipped in conversion.
So if we have ACEScg set up as C4D’s render space:
- We input sRGB #6495ED Cornflower Blue into C4D’s color picker.
- It gets linearized and converted to an ACEScg value. ACEScg covers the entirety of sRGB, so the conversion preserves the nature of the color without having to clip it or find an approximation.
- C4D sends that value over to Octane which converts it to Linear sRGB. Thanks to the encoding, it can store values in this color space that exceed its normal ranges and therefore doesn’t have to do any shifting. Cornflower Blue keeps its integrity.
- Octane converts it again to spectral values. Spectral values cover the entirety of the visible spectrum, so again, no need for shifting.
- Octane does render calcs using the spectral space. We used a flat, 100% white lighting scheme, and have nothing else in the scene that’s interacting with the object (reflections/emission/etc.) so the color value is still preserved.
- Octane converts the color back to a standard color space depending on what’s asked of it. This is either in the form of linear-encoded values for a supported working color space like ACEScg or Linear sRGB, or non-linear encoded values for a supported display color space like sRGB or rec.709. The interesting thing here though is that certain colors themselves take an overall longer or shorter amount of time to fully resolve in Octane into a uniform field than others regardless of the pipeline. In a quick test, a flat field of #E7C71F was a lot more uneven at 256 max samples than #555555, and for whatever reason, #FF00FF was nearly perfect even at very few max samples.
This means that ensuring absolute accuracy -if that’s truly needed - has to be done on a case-by-case basis. The other option is to just bypass all this, render out mattes and use those to flood solid colors in the post app if that’s what’s needed.
Where We’re At
That’s really it, there isn’t too much to do here.
Cornflower Blue is added into an Octane material via the C4D color picker where it goes through a series of conversions, but comes out Cornflower Blue on the other side if
- Our lighting is set up right, and…
- If we’re using Standard Surface, the weight is set to 1, and…
- No other contribution is adding to it (specular, bump, normal, etc.), and…
- We’re not using tone mapping. Also, the odds of it being the correct value in the C4D viewport is very low, and we just have to live with that. It doesn’t affect the render, just what we’re seeing as we’re working.
Let’s see what happens when we go to export our cube from Octane.
Part II: Exporting from Octane|II. Export from Octane
Time for our hero cube to have its moment out in the real world and be seen by millions. There are two ways this can go - either we’re so happy with our scene that we just want to export final files, or we need to send them to post for further editing. In this book of the guide, we’re going to look at first exporting directly from Octane, and then via C4D. Post will be in book III.
The Octane plugin itself has some commands in the Live Viewer menu that allow us to directly export files without going through C4D’s render pipeline. This is a good way to save files, because it avoids extra steps needing to get settings exactly right within C4D itself.
Overview of the Process
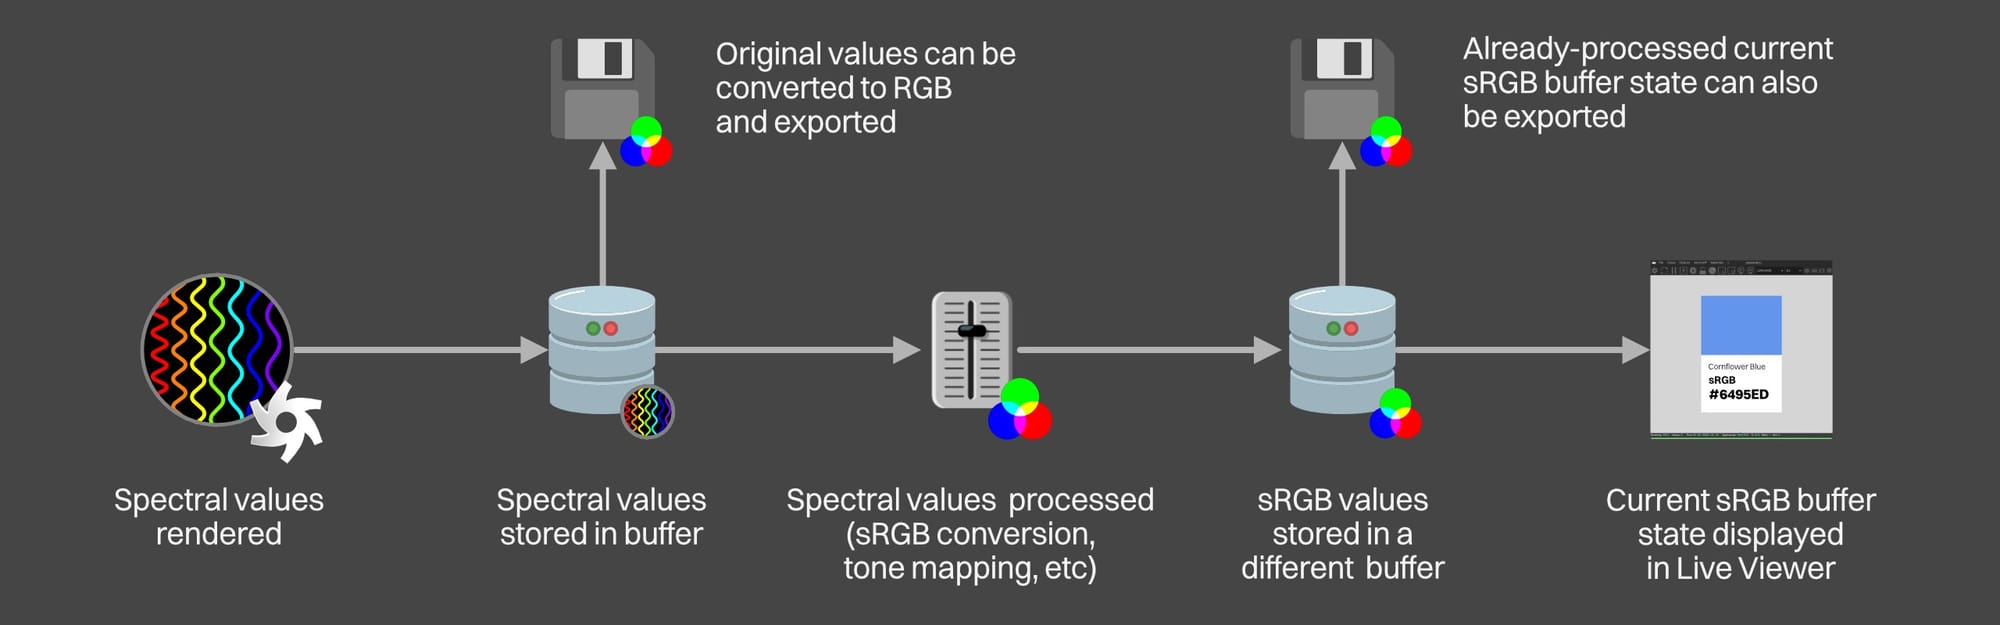
Octane gathers all the scene data, does a bunch of internal calculations and prep work, and then starts progressively rendering.
Once it builds up enough data, it stores the values it created in a buffer (designated area in memory). As it completes more of the render and refines the image more, it overwrites the buffer with the new values. It keeps doing this until the max samples limit defined in the kernel settings has been reached.
Every so often, it transforms the current state of the buffer to sRGB using whatever tone mapping and other processing we decided on and displays that in the Live Viewer. As it renders, we see the image resolve and get better and better until we hit the max samples we set in the kernel settings.
At any point in this process, we can grab the current state from either buffer and export it. This can either be the transformed state we see in the Live Viewer, or we can convert the original spectral values to working color space values (Linear sRGB / ACEScg / ACES2065-1, OCIO), and export that.
Copy to clipboard
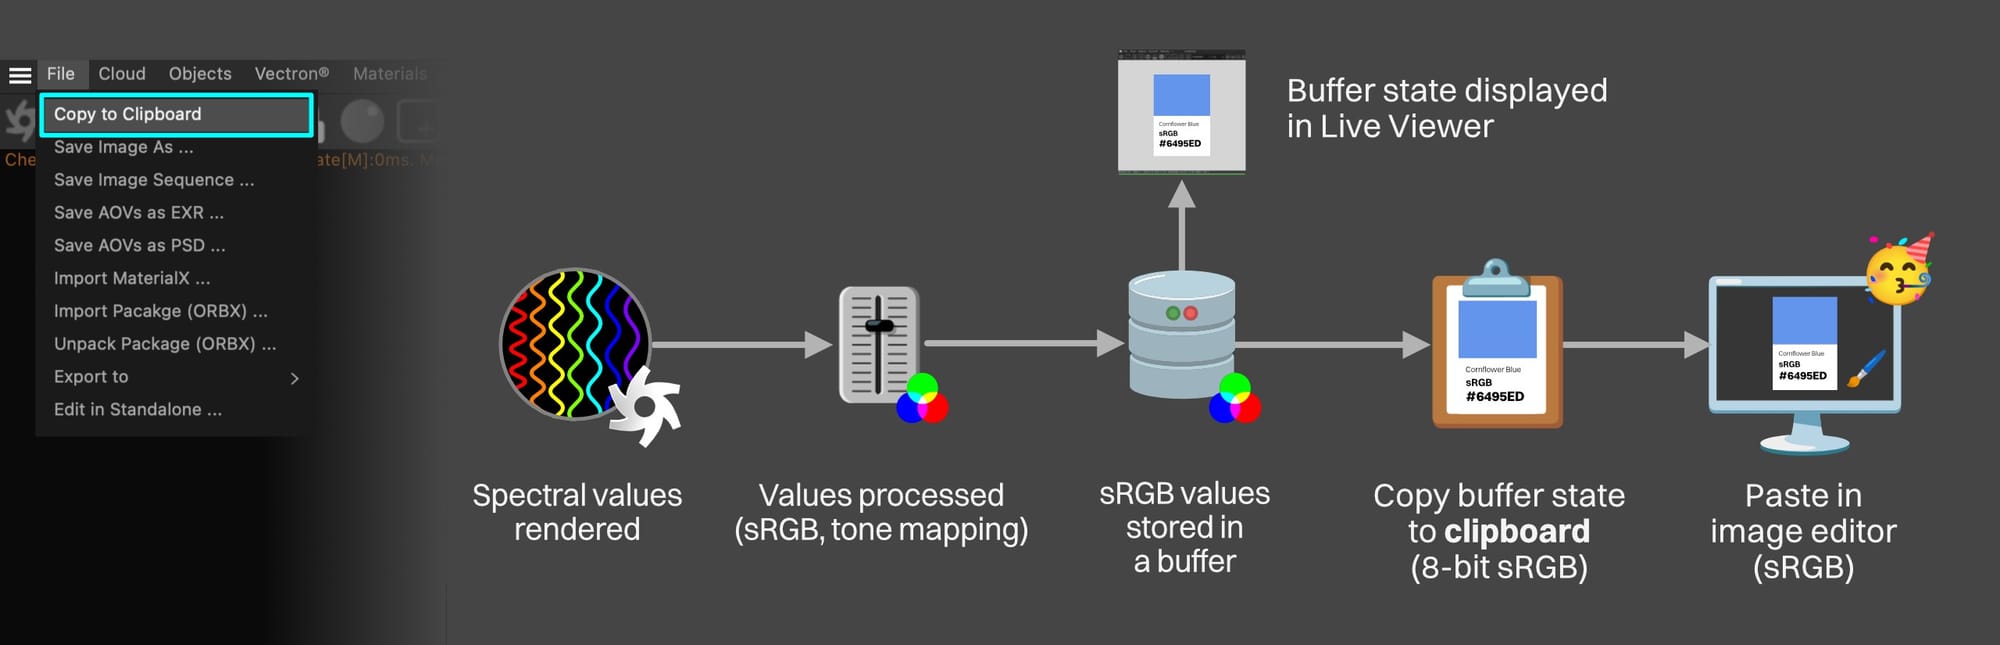
In the Live Viewer, the first command down in the File menu is Copy to Clipboard This takes the current state of the render as seen in the Live Viewer and copies it to the system clipboard as 8-bit sRGB values only. We can then paste it in an image editor or email or wherever.
Current state means:
- If there’s nothing in the buffer (like if we hit the
[R]button to clear it or just never rendered anything in this scene), even if something is showing in the Live Viewer, nothing will copy to the clipboard. It won’t throw an error or anything, it just won’t work. - If we had set our scene to use 5000 max samples, but got impatient and used this command while it was in the process of rendering and it was only up to 250 samples, the data in the clipboard will only be at 250 samples.
- The image will use whatever tone mapping we have applied (either none, or ACES tone mapping in the imager, or an OCIO one in the color space dropdown in the Live Viewer).
- If we have several AOVs, copy to clipboard will take the current AOV shown in the Live Viewer instead of just the beauty pass.
- If the Live Viewer’s resolution is not locked (using the lock icon in the UI), then the image will copy over in whatever size/aspect ratio the actual LV window is set to in C4D.
- If the resolution is locked and the first scale multiplier field is set to anything other than 1, it will copy whatever resolution it’s multiplied by. So if the render is 1000x1000px and that first multiplier is set to 2, the copied image will be 2000x2000px).
- If the resolution is locked, the second (zoom) multiplier will not affect what’s copied. So if the resolution is set to 1000x1000px, the first multiplier is set to 1 so it’s true to scale, the second zoom multiplier can be set to anything we want and the copied image will always be 1000x1000px.
- If “Alpha Channel” is selected in the Kernel settings and we see the transparency grid in the background of the Live Viewer, that literal transparency grid is going to copy with the image - the Live Viewer doesn’t support alpha. 8-bit sRGB values are going to be pasted into the target application. That application has to be ready to accept sRGB values, meaning either the current project is set to be sRGB, or the program knows that there are sRGB values incoming and can convert them to whatever color space the app uses.
Using all the C4D and Octane settings we’ve already established, using Copy to Clipboard on a 2025 MacBook Pro running C4D 2026.1.3 and Octane 2026.2 ver 1.8.4, our Cornflower Blue (#6495ED) survived the journey through the Mac’s clipboard and into Affinity Designer & Affinity Photo 2 (set to sRGB) and Photoshop 2026 (set to sRGB).
Save Image As…
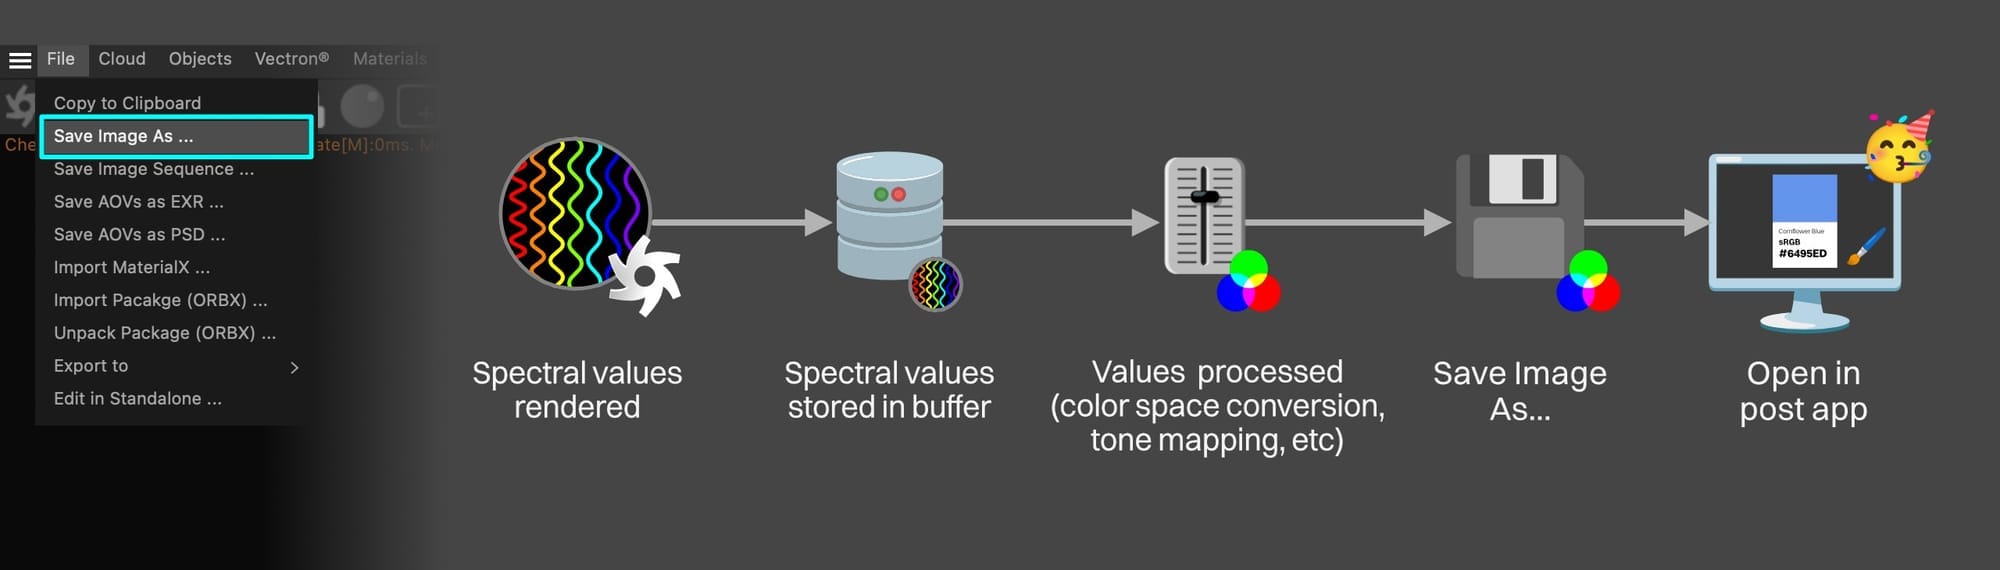
In the Live Viewer, the second command down in the File menu is Save Image As… This saves the current state of the render as seen in the Live Viewer as a PNG, JPG, TIFF or EXR.
This is similar to how Copy to Clipboard works, except:
- It saves a file to the disk instead of copying to the clipboard (duh).
- It does NOT use the Live Viewer’s Color Space dropdown. If we select PNG, JPG, or TIFF, it will just save as sRGB (or OCIO if we have that set up).
If we select EXR, we can choose Linear sRGB, ACEScg, or ACES2065-1. We can also for some reason choose sRGB (the non-linear variety). Don’t do this unless there’s a very good reason to - it defeats the point of EXR.
Important: If OCIO is selected, make sure a config is selected too. If it just looks like OCIO<>, the save will fail and not tell you why.
Force tone mapping only applies to EXR and is a bad idea unless we have a VERY compelling reason to turn it on. It also defeats the point of EXR.
- Alpha channel does work as expected.
- The Live Viewer lock/unlock state exports to disk just like they did in copy to clipboard. Make sure it’s locked and multipliers are at 1 to get an original-sized image. If it’s unlocked and the LV window is scaled, that’s the size that will save. If we save the file as a PNG, JPEG, or TIFF, when we open it in our post app - assuming it’s set to sRGB and works well with our monitor/system color space - our Cornflower Blue will be preserved.
If we save the file as an EXR, our post app will need to be told which color space we used (ACEScg, ACES2065-1, or Linear sRGB). It will also need to know which transfer function to use to display the image on the monitor. In our case we’d want straight sRGB (no tonemapping, LUTs, etc), and our Cornflower Blue will be preserved.
Save Image sequence

In the Live Viewer, the third command down in the File menu is Save Image Sequence… This pops up a box that lets us set some settings. When we hit “Start export”, it initiates a new render for every selected frame using a combination of the settings we just chose + the current kernel/imager settings and saves a series of files on our hard drive.
This works similar to how Save Image As… works, except:
- The frame range (and ONLY the frame range) is determined by a checkbox in the popup called “Use Render Settings”. If it’s off, every frame in our scene renders. If it’s on, it takes the frame range from the C4D render settings in the Output section. This does not affect other render settings like resolution, etc.
- Our only file type options are PNG and EXR.
- Weirdly, we can choose different color spaces for PNG - don’t do this. Leave it at sRGB. Also weirdly we can still choose sRGB as our color space for EXR. Again, never do this (even though it’s the default in this scenario). EXR should always either be Linear sRGB or ACEScg (or ACES2065-1 if we absolutely need that for some reason).
- Again, avoid force tone mapping unless you really need to do this for some reason (it only affects EXR)
- Resolution settings are taken from the C4D output. They are not affected by the “Use Render Settings” checkbox or the lock/unlock resolution or multipliers in the Live Viewer. If the frame is set to 1000x1000px in the C4D output settings, it will always render at 1000x1000px. Like Save Image As, our sRGB PNG files will open fine in our post app when we go to compile our frames and our Cornflower Blue color will be preserved.
Also like Save Image As, our EXR files will open fine in our post app, but it needs to be told which color space we rendered as, and which transfer function to use. If it’s straight sRGB with no tonemapping or additional processing, our Cornflower Blue will be preserved.
Where we’re at
We bypassed C4D and saved images out of Octane in one of several ways. It rendered spectral values, converted them to RGB ones, and then did the processing (color space conversion and tone mapping), and ended us up with a display-ready file that kept Cornflower Blue happily intact.
Part III: Exporting from C4D|III. Export from C4D
Using C4D’s Pipeline
So we saw what it’s like to skip C4D’s influence altogether. It’s straightforward and direct (except for a few annoying but avoidable pitfalls), and will work for some people some of the time, but not everyone all of the time.
By introducing C4D into the mix, we get a few new options opened up to us, and we bring some familiarity for veteran C4D users, but we now have to be really careful to navigate C4D’s color space minefield.
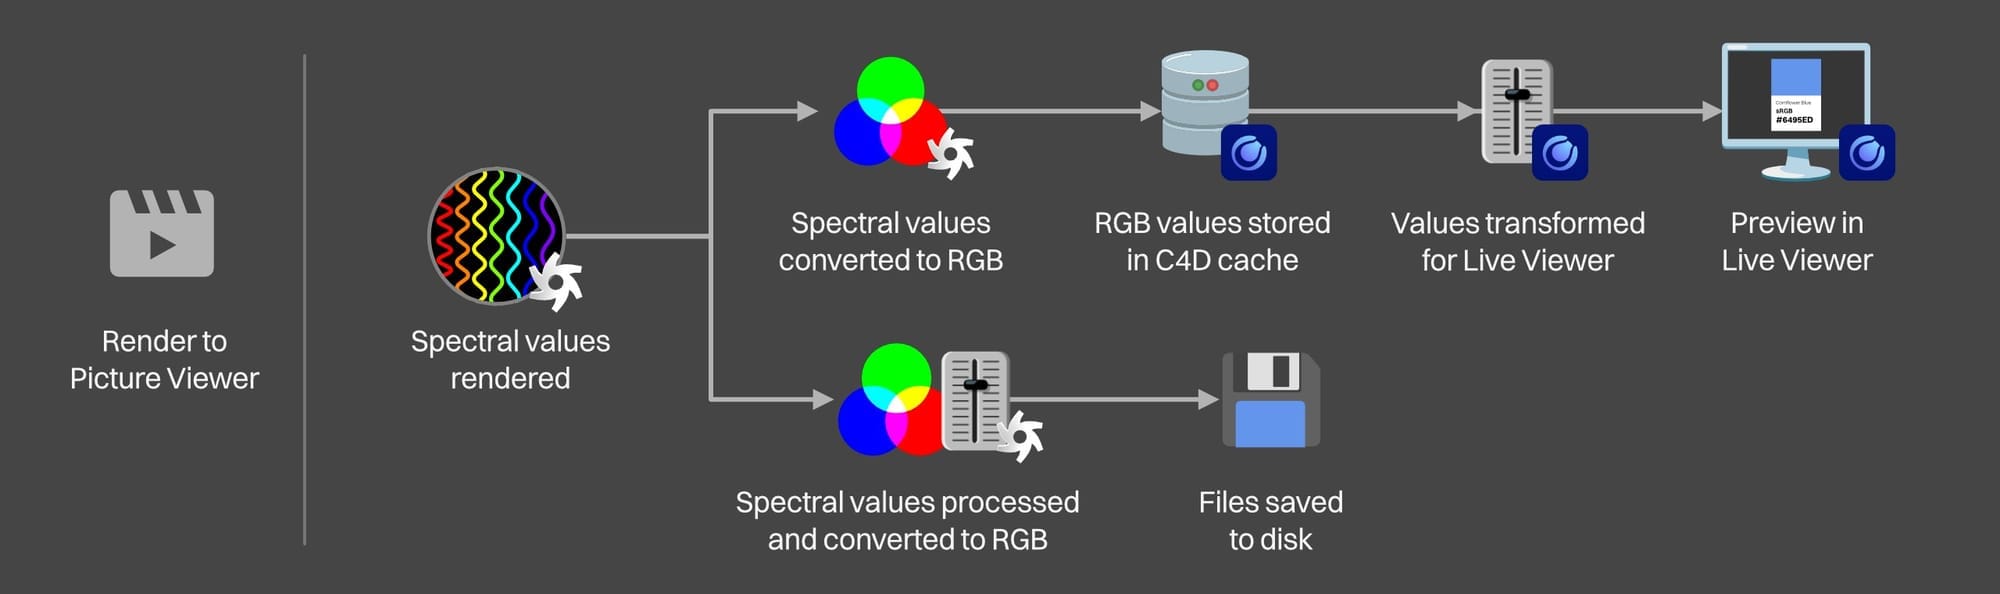
What we’re looking at here is using C4D rather than Octane to initiate and process a render. C4D has a few ways of doing this including render to picture viewer, add to render queue, make preview, and takes. All of the concepts we’re going to look at here are valid for all of those things, but we’re going to focus on Render to Picture Viewer here to keep things as simple as we can.
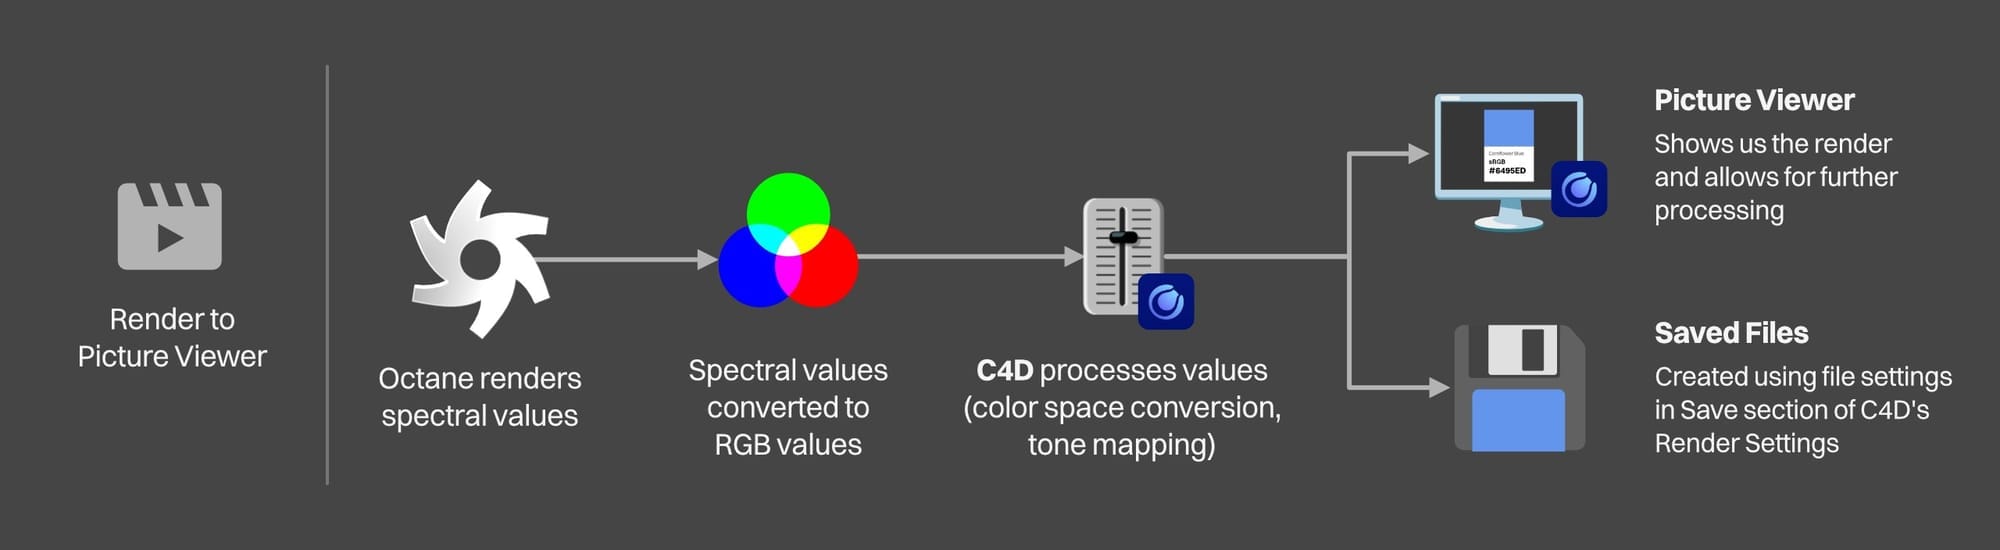
In a nutshell, what happens when we use one of these commands is that C4D tells Octane “hey, the user just asked for a render”. Octane is all “coming right up” and generates spectral values and puts them in a buffer. C4D can’t process spectral values, so Octane needs to convert them to RGB ones.
It then passes those RGB values over to C4D which stores them in its own buffer, and then processes them (converts to a display color space, applies tone mapping, and whatever else we told it to do). Finally it saves the image to a file and/or sends it to the Picture Viewer.
Let’s look at the save functionality here - the Picture Viewer and its settings is a whole other beast that will feature predominantly in Book III of this series.
C4D’s Save Section
C4D users who have used Standard, Physical, Redshift, or some other engine should be somewhat familiar with the Save section. If we’re using one of these other engines, this is where we set the file format and path where the files are going to be saved to.
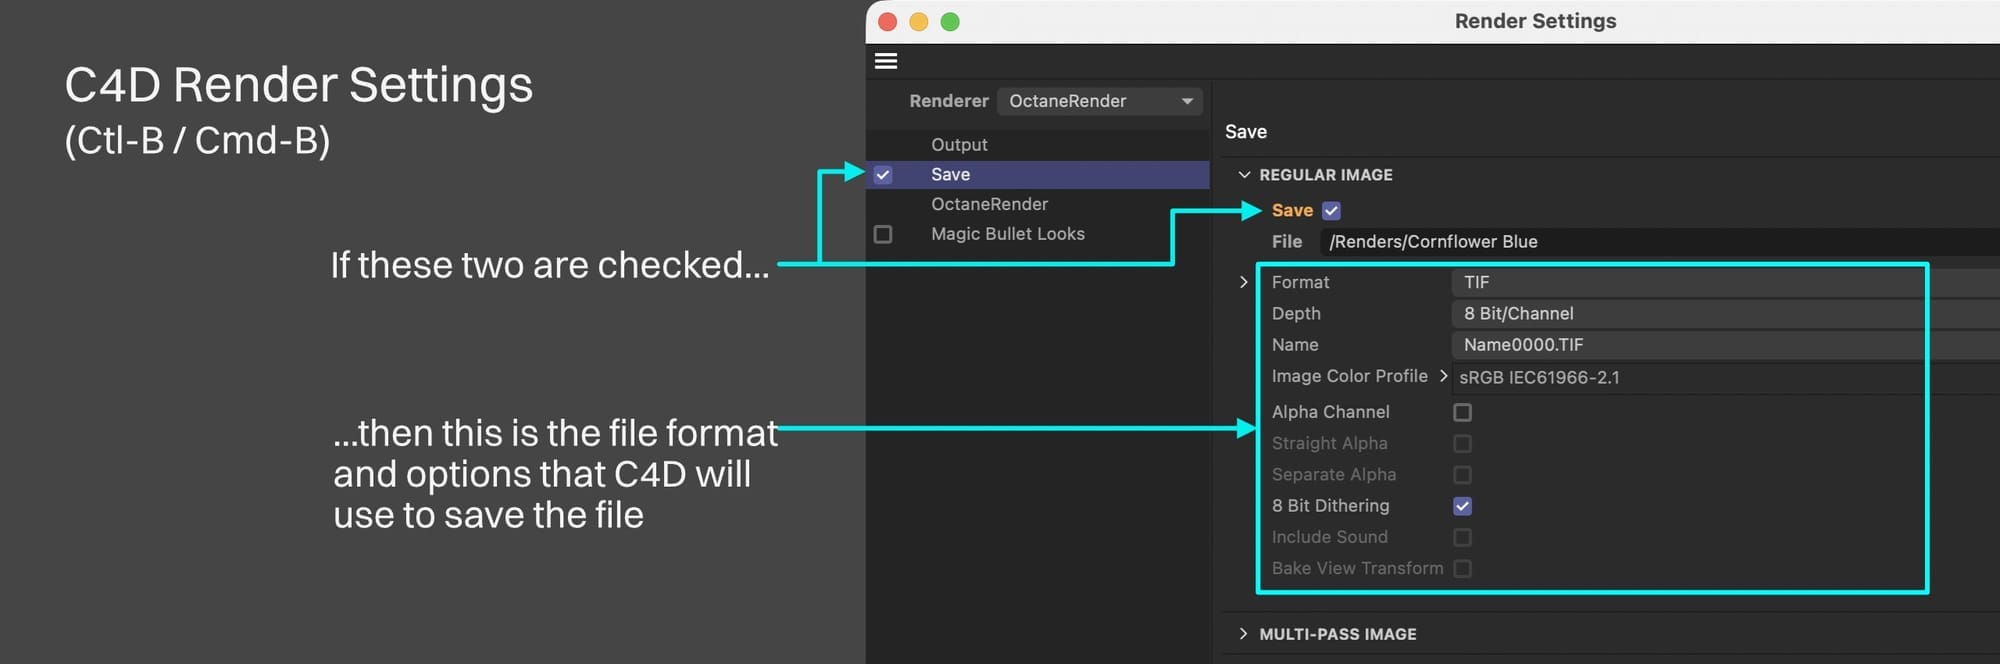
The entire section can be turned on or off, and within it, there are also individual Save checkboxes for the Regular Image, Multi-Pass, and Compositing Project File that can also be turned on or off individually. We’re going to ignore multi-pass and the compositing sections and just focus on Regular image.
Important: This entire save area in C4D’s render settings is not necessary for us Octane users, even if we’re using Render to Picture Viewer. We can use it, but there’s another way that we’ll look at later that avoids some of the issues we’re going to run into here.
When Render to Picture viewer is run, if both the Save section is checked and the Regular Image’s Save checkbox is checked, then all of the file format settings will be applied before C4D saves files in the path specified in this section. If either or both of them are not checked, Octane will still render and C4D will still process the data, but it’ll only send it to the Picture Viewer and not also save files.
What Octane Sends to C4D
It’s been beaten into our heads already, but why not say it again: Octane renders spectral values. C4D does not understand spectral values. Octane needs to convert them to RGB values before it can pass them off to C4D.
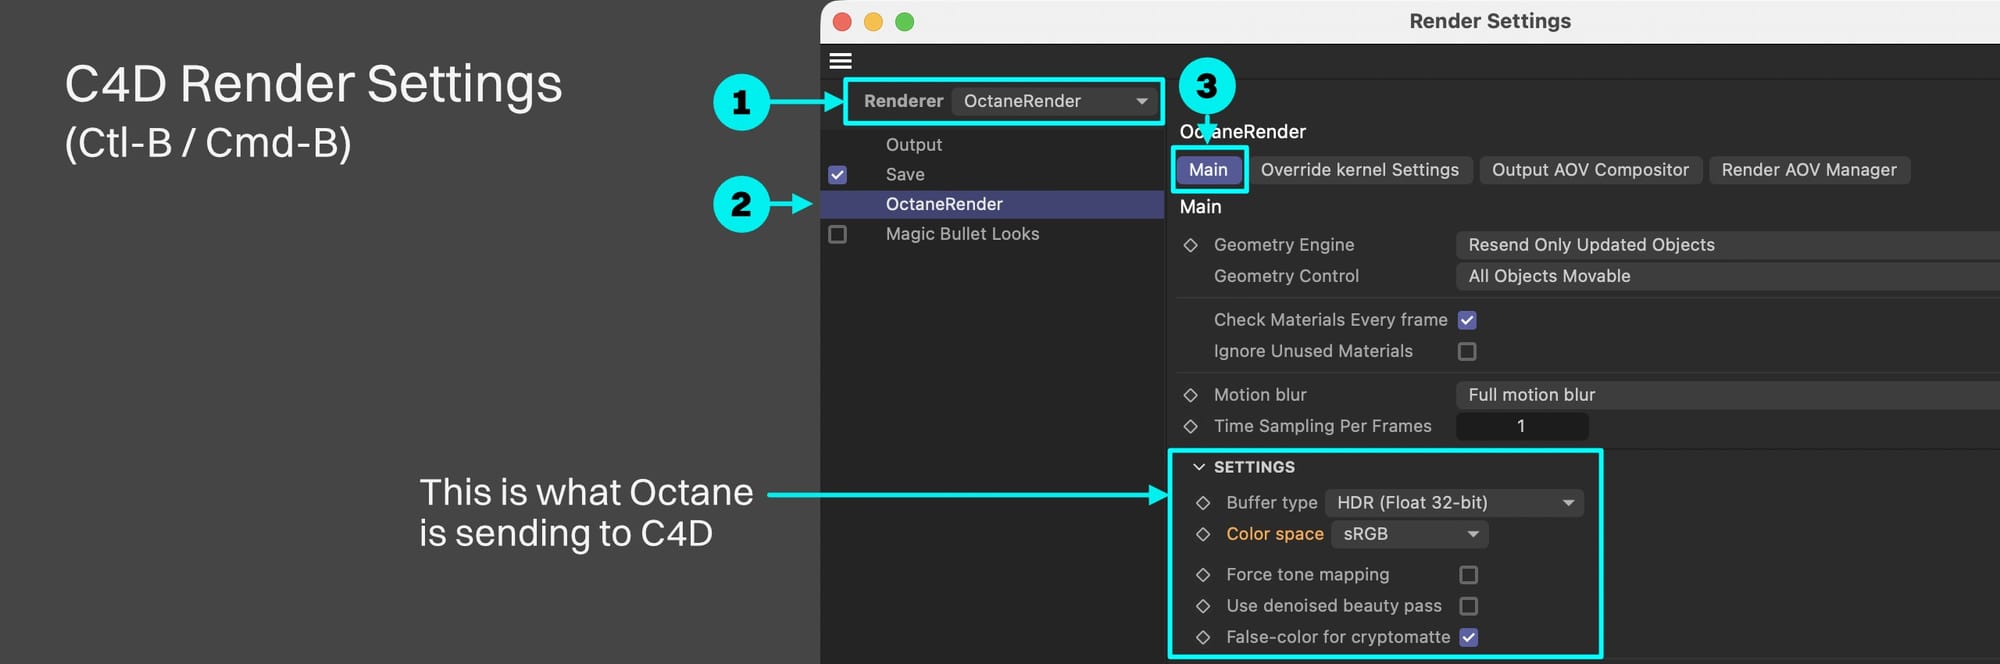
But how does it know which color space to use?
This is found in the Color space section in the Main tab of the OctaneRender portion of the Render settings (Ctl-B / Cmd-B) when the Renderer is set to OctaneRender.
Working Color Space Matching
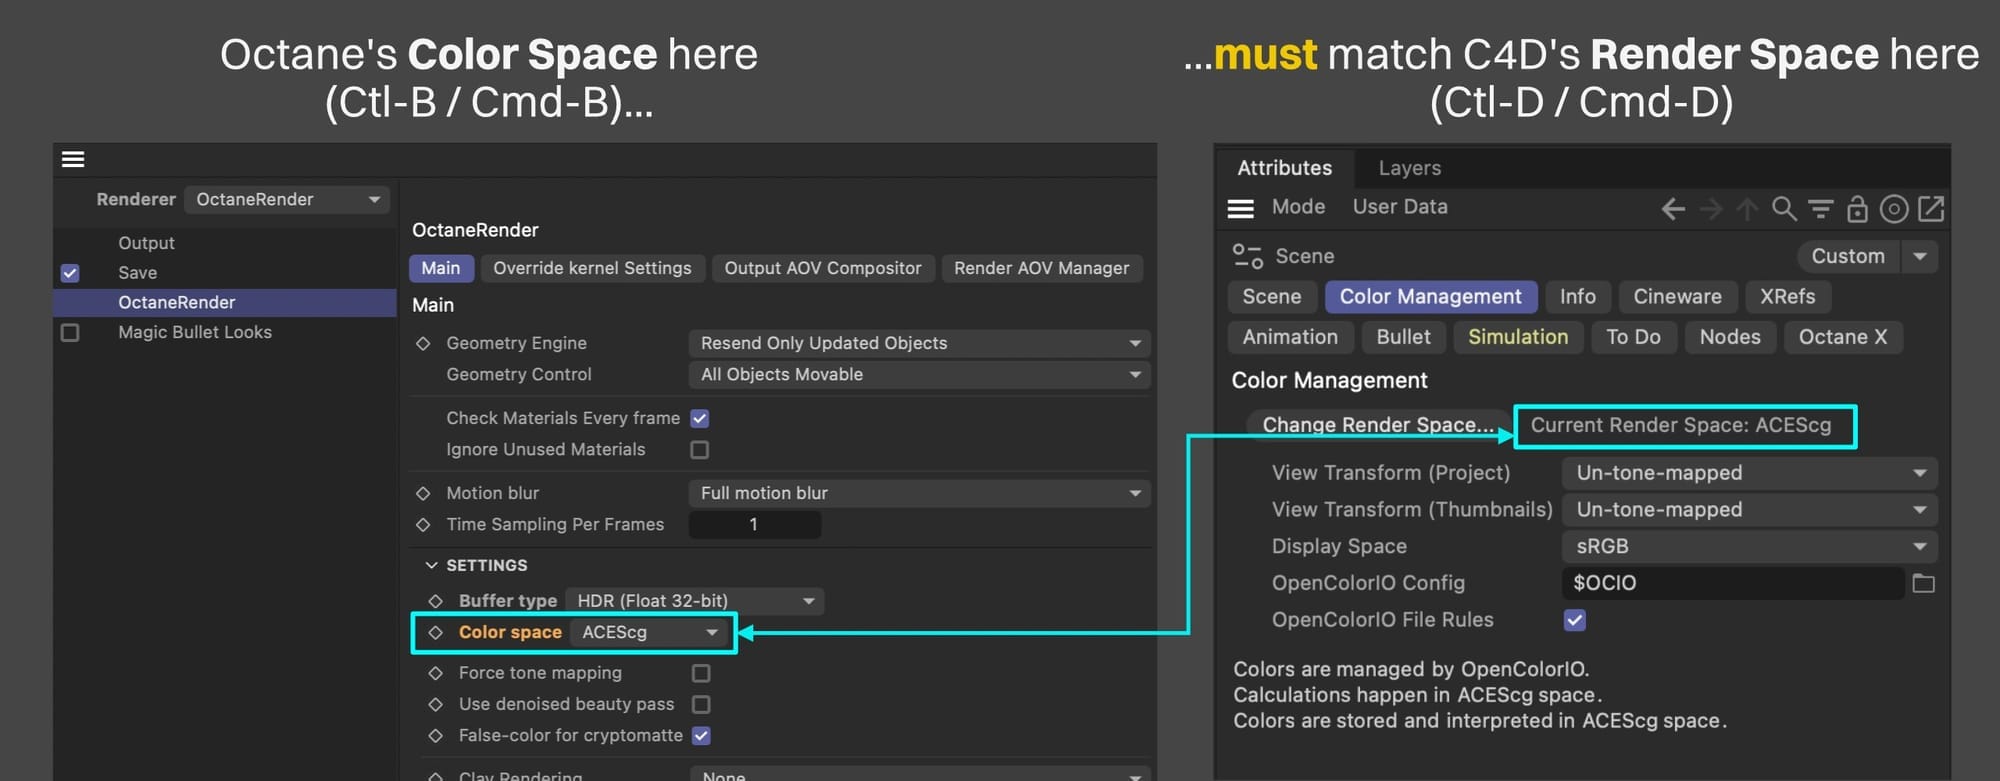
Important: This is the biggest pitfall in the whole process. The key takeaway here is that the Color space setting in the Main tab of the Octane Render area of the C4D Render settings MUST match C4D’s Render Space settings in the Color Management tab of C4D’s Scene settings. If it doesn’t, we’re in for a world of hurt when we go to save files.
The reason these need to match is that C4D isn’t actually aware of what color space Octane is sending data in. It just sees it as garden variety “linear” data. It knows what it’s expecting though, and that’s the working color space in the current Render Space.
This is what it looks like if they don’t match:
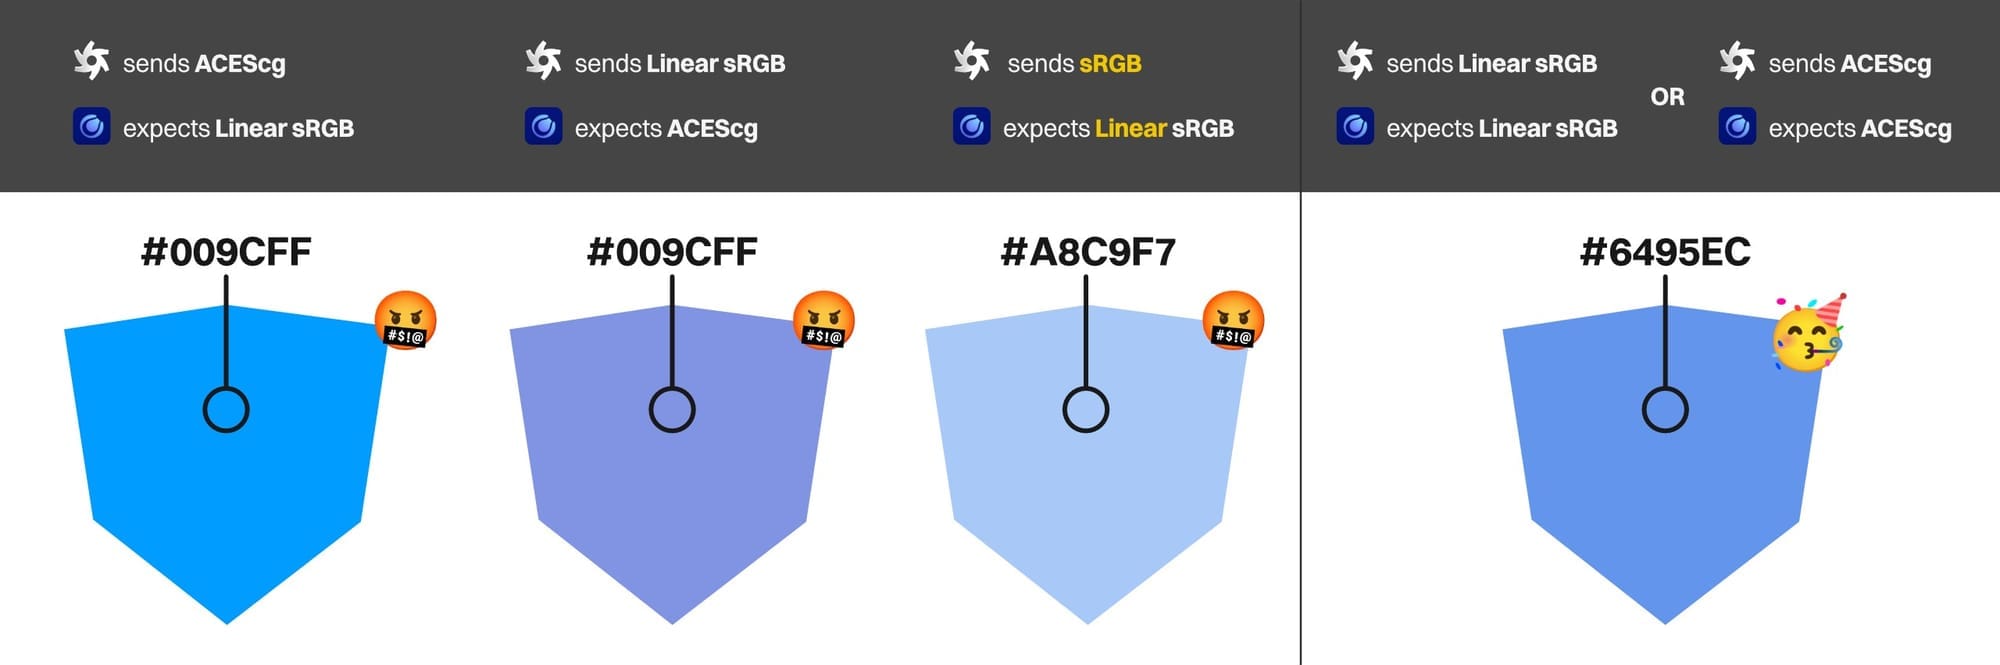
ACES <-> sRGB makes sense, but the big gotcha here is going to be when we want to export either Linear sRGB source files or regular old non-linear sRGB display files. These two color spaces are going to require very different settings, and as we can see above, getting that wrong means our cube will go 🤬, and we don’t want 🤬, we want 🥳.
View Transform (Project)
The last step of the process is where C4D does any transforms or other processing, bundles up the data into the file format we picked and bakes it into the saved file. It also passes this setting to the Picture Viewer, but it can be changed there after the fact.
This is going to be different depending on whether we’re exporting source files for post (linear-encoded ones using ACEScg, Linear sRGB, or some other working color space), or display files (non-linear encoded ones using sRGB or some other display color space).
Source files
If we’re sending linear-encoded data (ACEScg, Linear sRGB, etc) to C4D, and saving EXRs or other formats that support 16- or 32-bit linear-encoded float data, C4D will not do any processing or tone mapping. It’ll just send the data straight through to EXR without even checking to see if it’s in the right color space (that’s why it’s so important for us to set it right).
In this case, it does not matter what the View Transform is set to here - it won’t affect the saved file. It’ll be up to the post app to apply the processing, and only then will we see if Cornflower Blue was maintained.
Display files
When saving lower bit depth non-linear data, C4D will process whatever data it gets from Octane before shoving it into a JPEG or PNG or some other integer-encoded format. This processing includes a color space conversion and tone mapping.
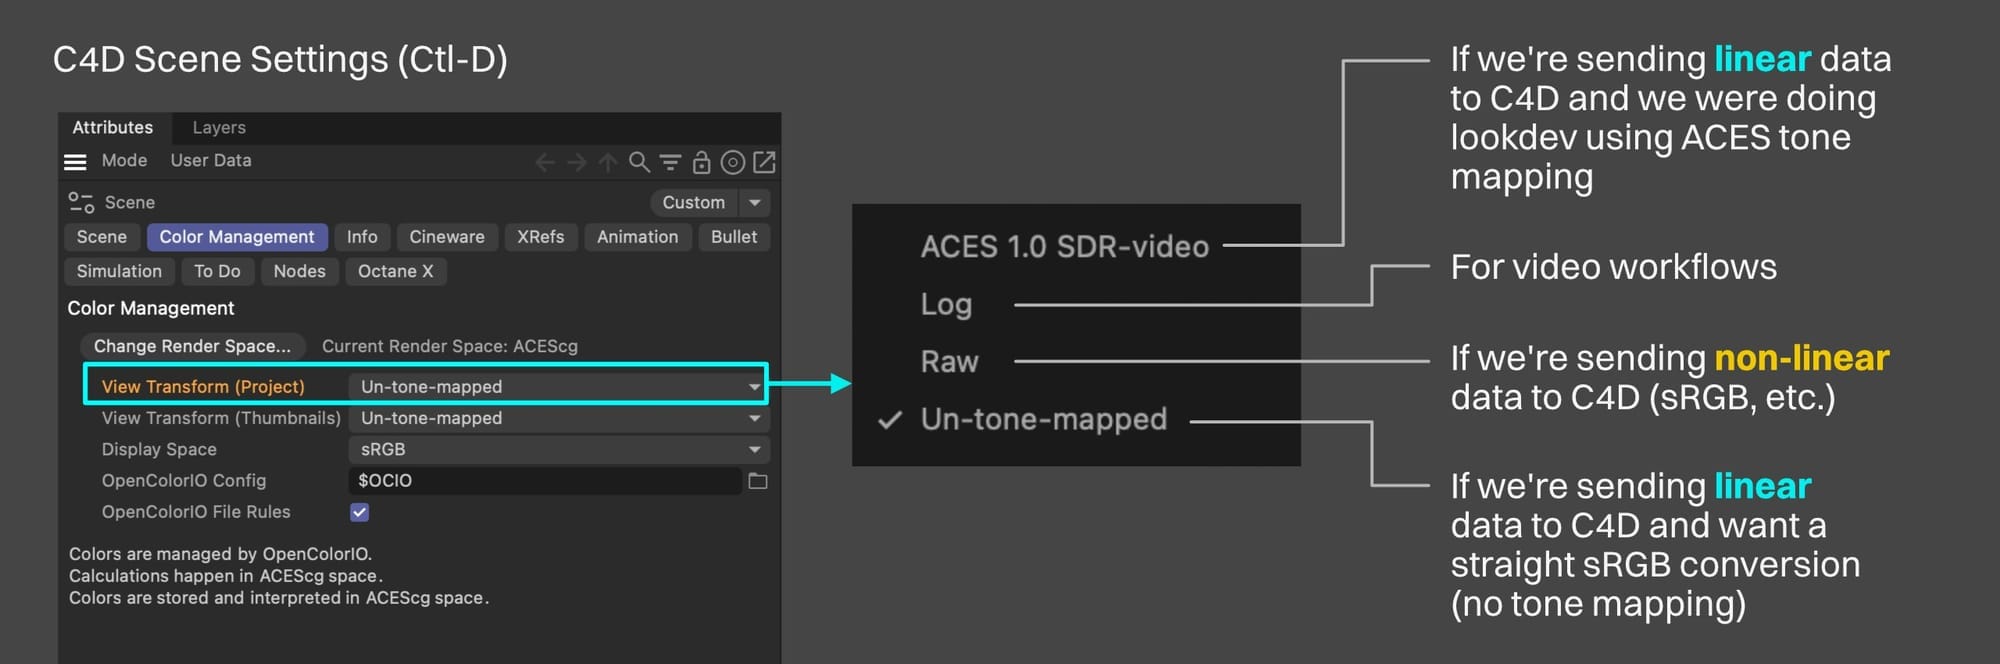
The settings for how C4D will do the color space conversion and apply tone mapping are found in the C4D Scene Settings (Ctl-D / Cmd-D) under the Color Management tab in the View Transform (Project) settings.
Our options here are:
ACES 1.0 SDR-video, which is equivalent to ACES Tone Mapping in Octane if we were using that for lookdev. If we’re sending linear-encoded data from Octane, ACES tone mapping won’t be included in this (by default - we can override this, but shouldn’t). Instead, C4D takes the unprocessed linear values, uses the ACES RRT+ODT (what we call tone mapping), and creates lower bit depth data to put into a PNG, JPEG, or something like that.
Log is for video workflows. We’re not going to cover that here.
Raw doesn’t process the values and sticks them into a PNG/JPG as-is. This means we need to send already-processed values from Octane (sRGB). There are cases where we’d want to do this, but usually we’d rather have Octane send linear-encoded data and have C4D process it if we’re using its pipeline anyway.
Un-tone-mapped, which is a straight sRGB conversion without tone mapping. If we are sending linear-encoded data from Octane (Linear sRGB, ACEScg, etc), and want to see our Cornflower Blue unchanged throughout the process, this is what we pick.
Practical Workflows
ACES Workflow
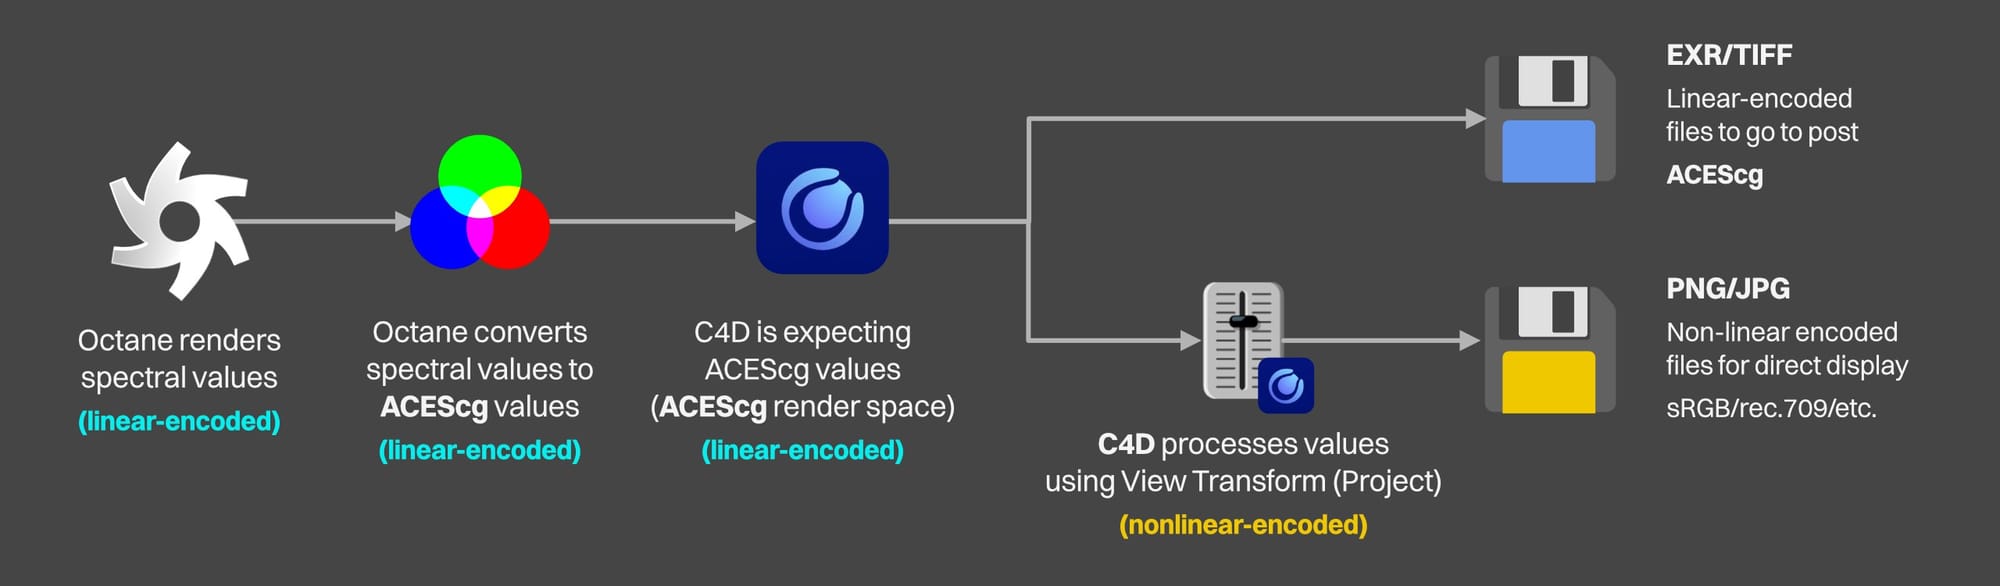
If we have C4D’s Render Space set to ACEScg, we need to tell Octane to convert its spectral values to ACEScg in the Color space setting in the Main tab.
Octane will pass ACEScg values to C4D which is expecting ACEScg values, and C4D will then do the transforms based on ACEScg.
If we’re saving an EXR, it will save it in the ACEScg color space - our post app will have to know to use that, and then when it does all the tone mapping and other processing, our colors will come out as expected.
If we’re saving a PNG/JPEG/etc, it will save in the sRGB color space using the tone mapping set in the View Transform (Project) settings. If it’s Un-tone-mapped, Cornflower Blue will be preserved. If it’s anything else, it’ll shift (as expected).
Linear sRGB Workflow
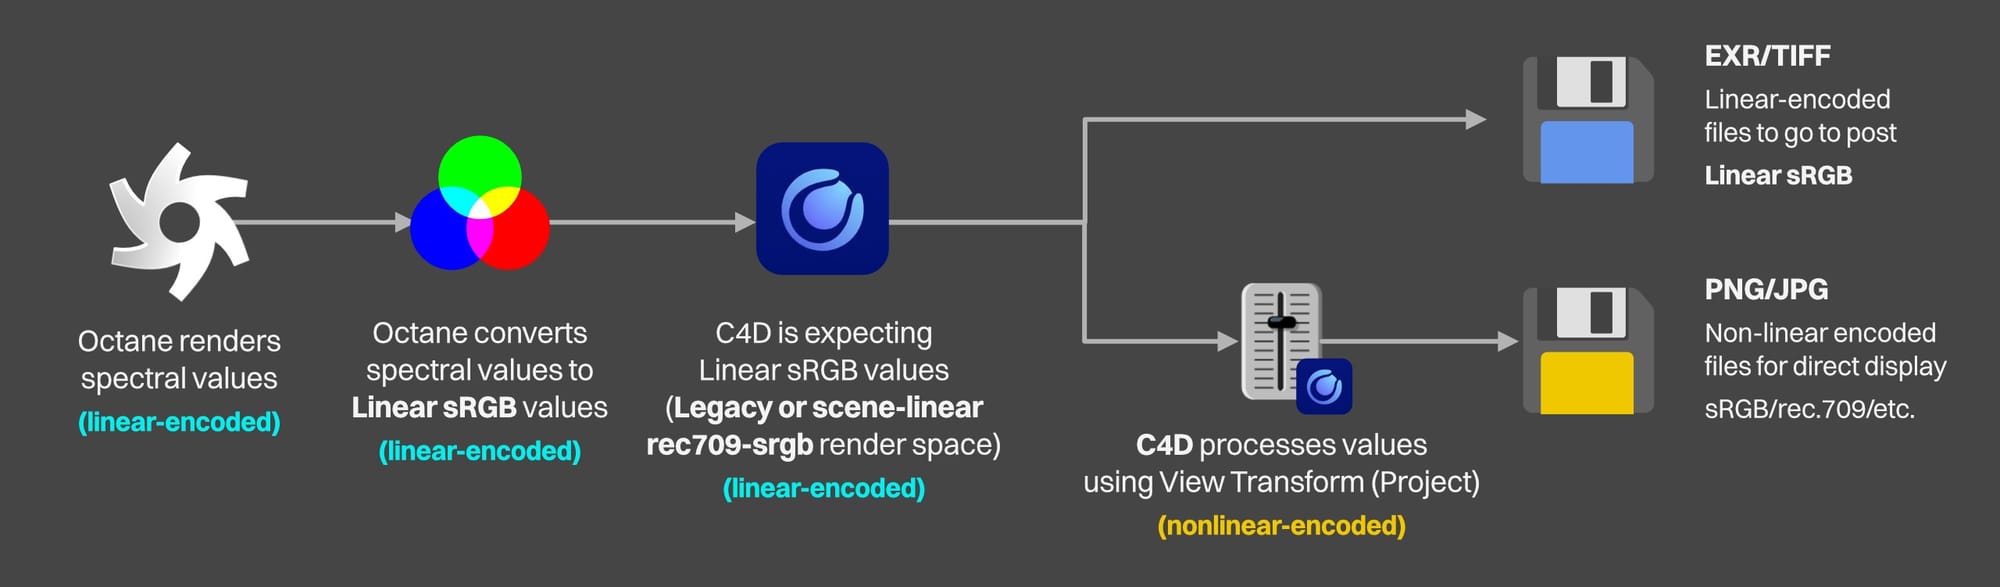
If we have C4D’s Render Space set to either Legacy or scene-linear rec.709-sRGB, then we want Octane’s color space to be set to >>Linear sRGB<< . Not. Not. NOT sRGB (HDR or LDR). Octane will send Linear sRGB values to C4D which is expecting Linear sRGB values, and C4D will then do the transforms based on Linear sRGB.
From here, it’s the same deal as ACEScg: EXRs will save as Linear sRGB and the post app will do the rest. PNGs/JPEG/etc. will save using the View Transform (Project) settings for tone mapping and other processing.
Again, un-tone-mapped will preserve the colors, anything else won’t.
sRGB Workflow

Another thing we can do – if we need to – is to bypass C4D’s processing step and force it to just save whatever Octane gives it. The hybrid approach laid out in the next part of this guide is probably a better way if we’re not using C4D to process the images, but this will work if needed.
Any working color space (Render Space) will be fine for this in C4D’s Scene Settings, since we’re not asking it to take linear-encoded values and create non-linear encoded ones. We’re basically saying “just take this data exactly as-is and JPEGify it, thanks, good talk.”
Important: What’s crucial here is that we set Octane’s Color Space to sRGB in the Main tab (HDR or LDR, it doesn’t matter), and then make sure that the View Transform (Project) is set to Raw in the View Transform (Project) area of C4D’s Scene Settings. Raw is what tells it to pass the values through without altering them. It will look wrong in the Picture Viewer on a non-sRGB monitor, but it will save correctly.
Force Tone Mapping (Don’t.)
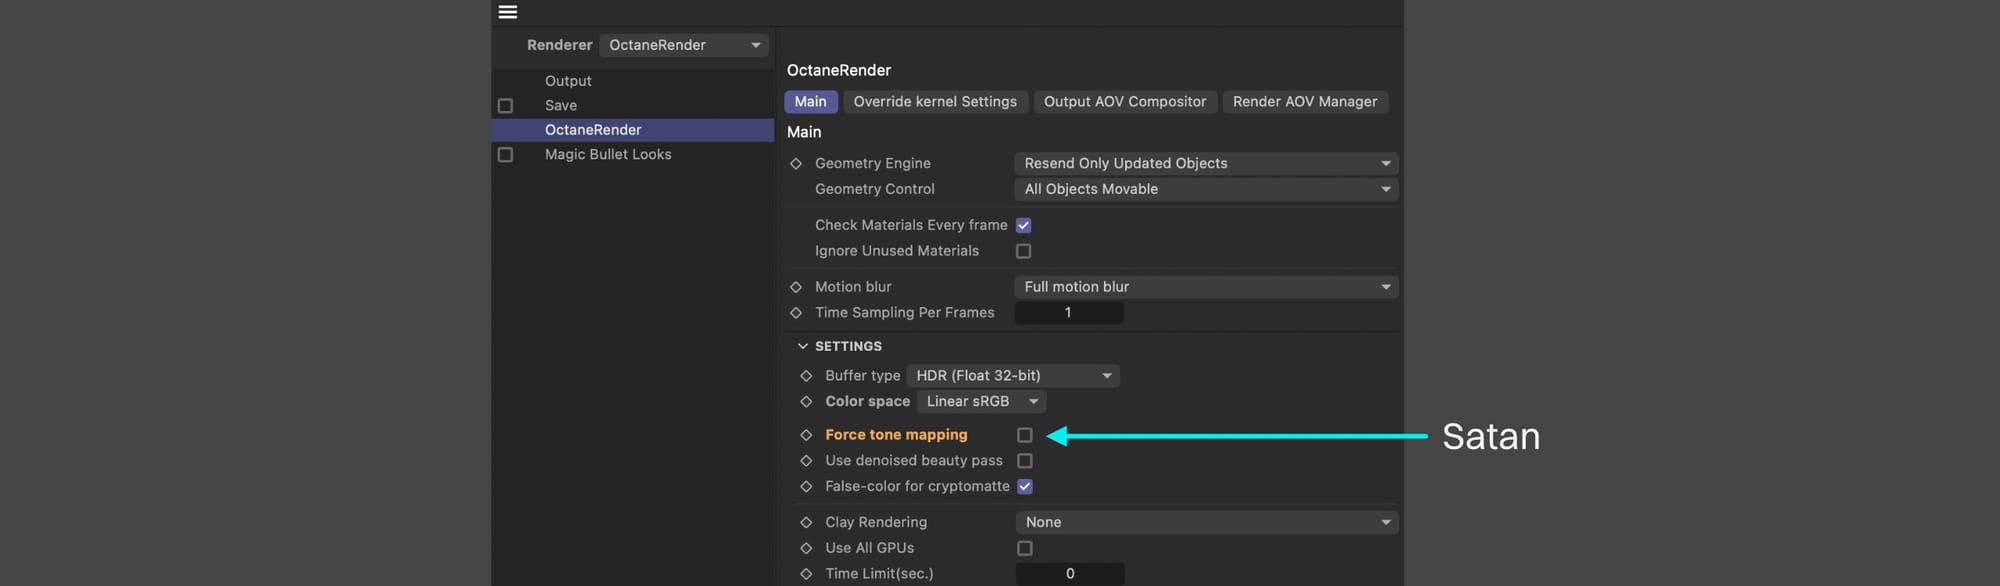
Important: If we’re using C4D to save our files, we want to go all in on C4D’s processing. This means we need to have Octane send original, unaltered, linear-encoded values so that C4D can further prepare them for final distro. And THIS means DO NOT USE FORCE TONE MAPPING in Octane. Force tone mapping pre-processes and clips the linear-encoded values it sends that to C4D which will in turn process it again and our colors in the saved files will be incorrect.
Maybe there’s a world where this setting is needed, but it’s certainly not in any normal situation.
Where We’re At
Octane is sending values in the working color space C4D is expecting. We’re not ruining our data with Force tone mapping. C4D is using its View Transform settings to further process the data, and then bundle it up using the settings found in the Render Settings in the Save section (which needs to be ticked on to save), and it produces a file.
If we did everything right, our Cornflower Blue is once again preserved through the system and our hero cube is happy.
Part IV: A Hybrid Approach|IV. Hybrid Approach
Best of Both Worlds
We also have an option to use C4D to initiate the render, but do all the processing and saving through Octane.
Why would we want to do this?
One good use case is if we’re doing a multi-frame render for EXR and want Octane to save the files directly, but we want to keep an eye on a preview of each frame as it gets created.
We can tell Octane’s sequence exporter to send the current frame to Octane’s Live Viewer, but it doesn’t store past frames, so if we go away for a coffee and come back, we can’t look at an earlier section of the render. The Live Viewer allows us to store frames manually for A/B comparison, but we’re not going to sit there and wait for every frame to render and quickly mash that button before the next frame starts.
By having C4D initiate the render with Render to Picture Viewer, each frame will be stored in C4D’s buffer and fed into the Picture Viewer and we can easily scroll through them to check different parts of the render. The final exports will still be Octane’s job, but we’ll be able to keep an eye on what’s happening.
There are probably other workflows that involve takes and C4D’s render queue that would benefit from this, but this guide is already getting long.
Book III will look at the Live Viewer in depth, so we’ll just focus on the save portion of this process here.
Save settings
Both things we need to do here are in the C4D Render Settings (Ctl-B / Cmd-B)
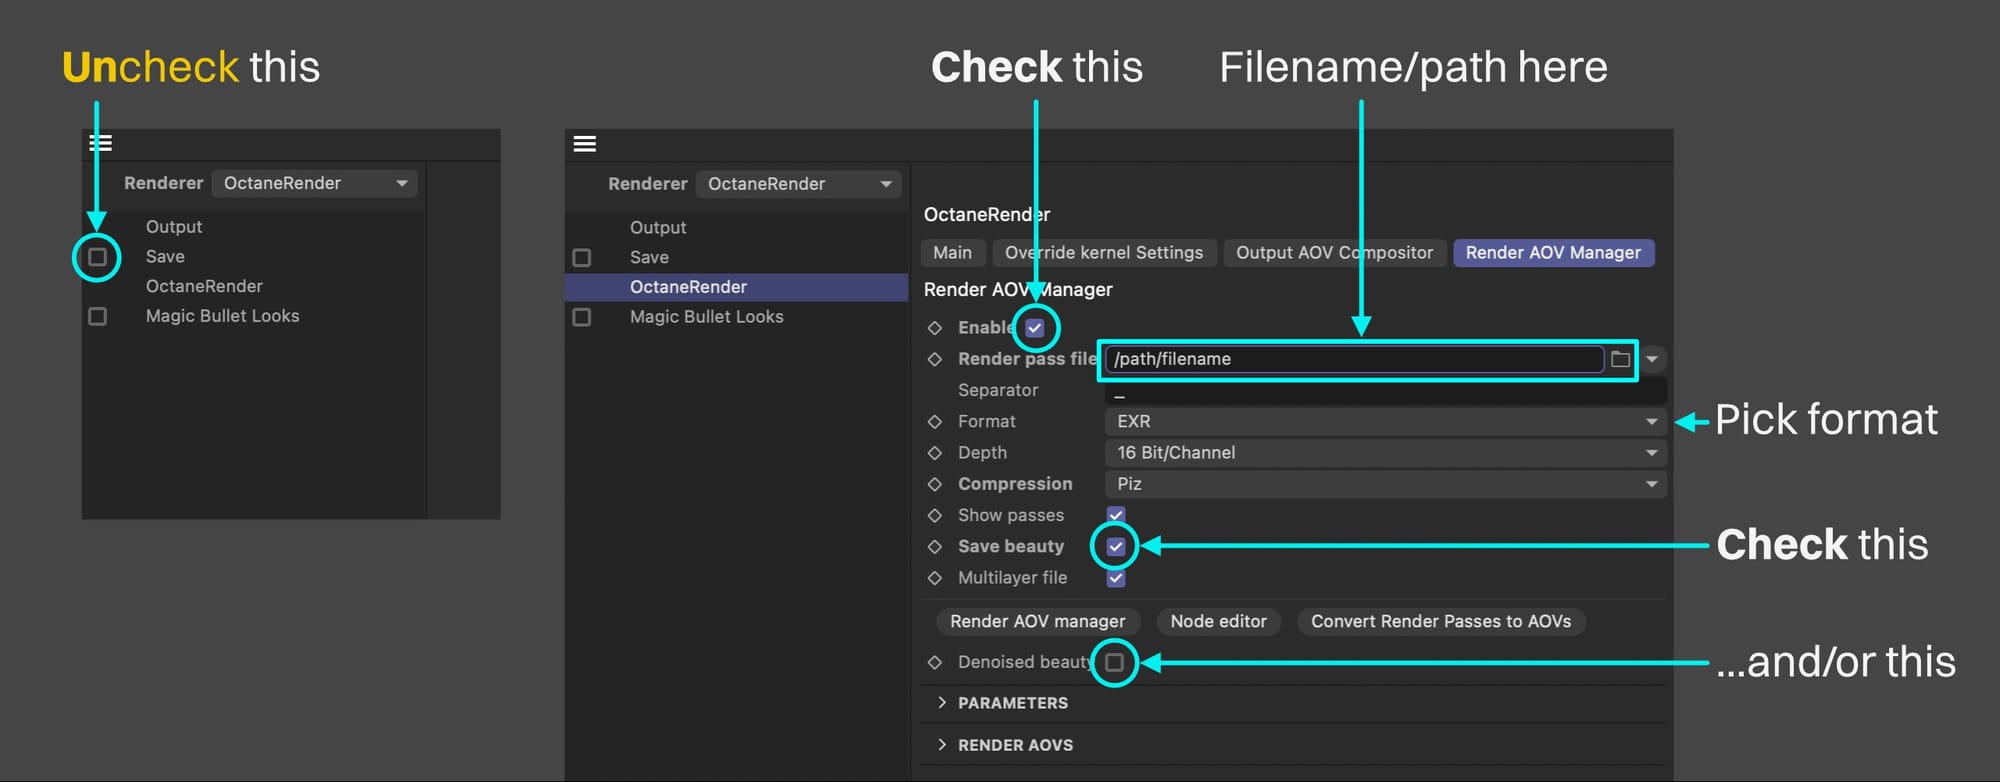
First thing we want to do is turn off the entire C4D Save section by unchecking the whole thing. We do not want C4D writing any files.
Next we need to go to the OctaneRender section, and over to the Render AOV Manager tab. Even though we may not be doing anything that we’d probably consider “AOVs”, this is where these settings live for now.
Important: The “Enable” checkbox is OFF by default - we want this ON. If it’s off, Octane is not going to create any files. Since we unchecked C4D’s save section as well, this means no files will be written at all (they’ll all still be cached and go to the Picture Viewer though)
Next we can put our path in. This goes in the Render pass file box.
After that, we’ll need to choose our file type. It’s EXR by default since this tab is mostly about AOVs, but we can set it to PNG, JPEG, TIFF, or a few others, and then that opens up more settings for each format.
Finally we need to decide what to render. We’ll probably either want a beauty render (which is what we see as “Main” in the Live Viewer), or a denoised beauty render (what we see as DeMain in the Live Viewer if we’re using the denoiser). We can choose one or the other or both. There are reasons why we’d want both off, but that’s for another guide.
Important: We need at least Save Beauty on OR Denoised beauty on (both will work too) in order for Octane to write a file to disk.
If we’re rendering EXRs, TIFFs, or anything else that allows for multiple layers, and we have both Save beauty and Denoised beauty on, they’ll come in as two layers in a single file. If we have it off, Octane will generate two files - one for each.
Color Management
And the crowd. goes. wild.
High bit depth “source” files
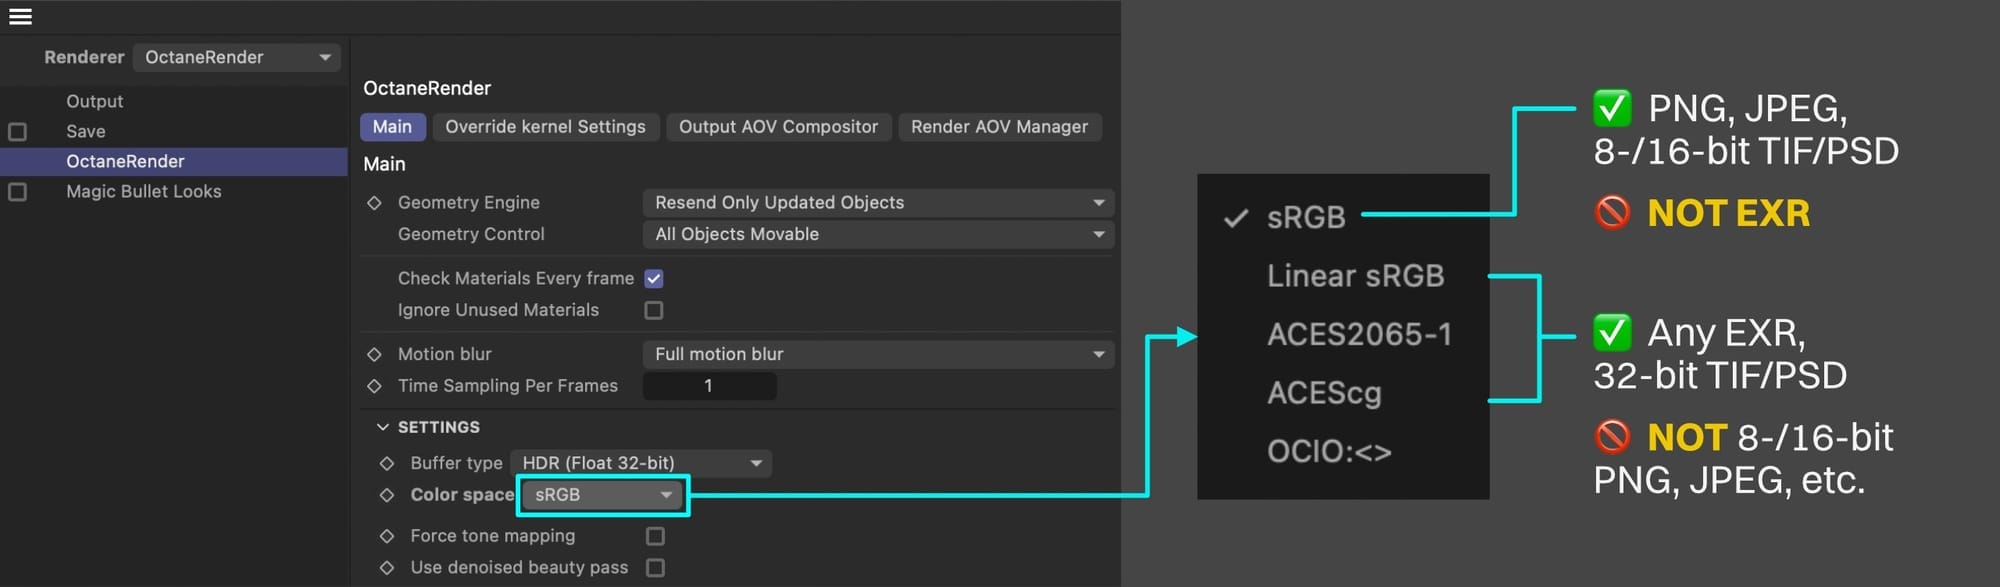
If we’re saving EXR files (or 32-bit TIF/PSD which are float-encoded): We need to go into the Main tab again and pick ACEScg, ACES2065-1, or Linear sRGB (we’re not covering OCIO here).
Important: What this should NOT be set to for EXR or 32-bit TIF/PSD files is sRGB - that will clip the values , which will destroy the file. Yes, it’s the default, but it’ll wreck our files, so we really want to avoid it.
Once again, Force tone mapping should be off 99.9999% of the time. There may be some point in our careers where we come across a situation where this is needed, but today is not that day.
Lower bit depth “display” files
If we’re saving an 8- or 16-bit integer-encoded file like a PNG, JPEG, etc, THIS is where we’re going to want the color space set to sRGB (or some sort of OCIO setup).
A note about the Picture Viewer
Regardless of what we choose here, if we Render to Picture Viewer, we’ll see our images appear there.
If we’re exporting linear-encoded files (Linear sRGB, ACEScg, etc), then we can make the colors appear correctly in the Picture Viewer.
If we’re exporting directly to sRGB or some other lower bit depth color space, unless our monitors are set to that color space, the colors will NOT appear correctly in the Picture Viewer (they’ll be close, but not exact).
Again, we’ll look at why this is in the next book, but it’s something to be aware of.
Tone Mapping
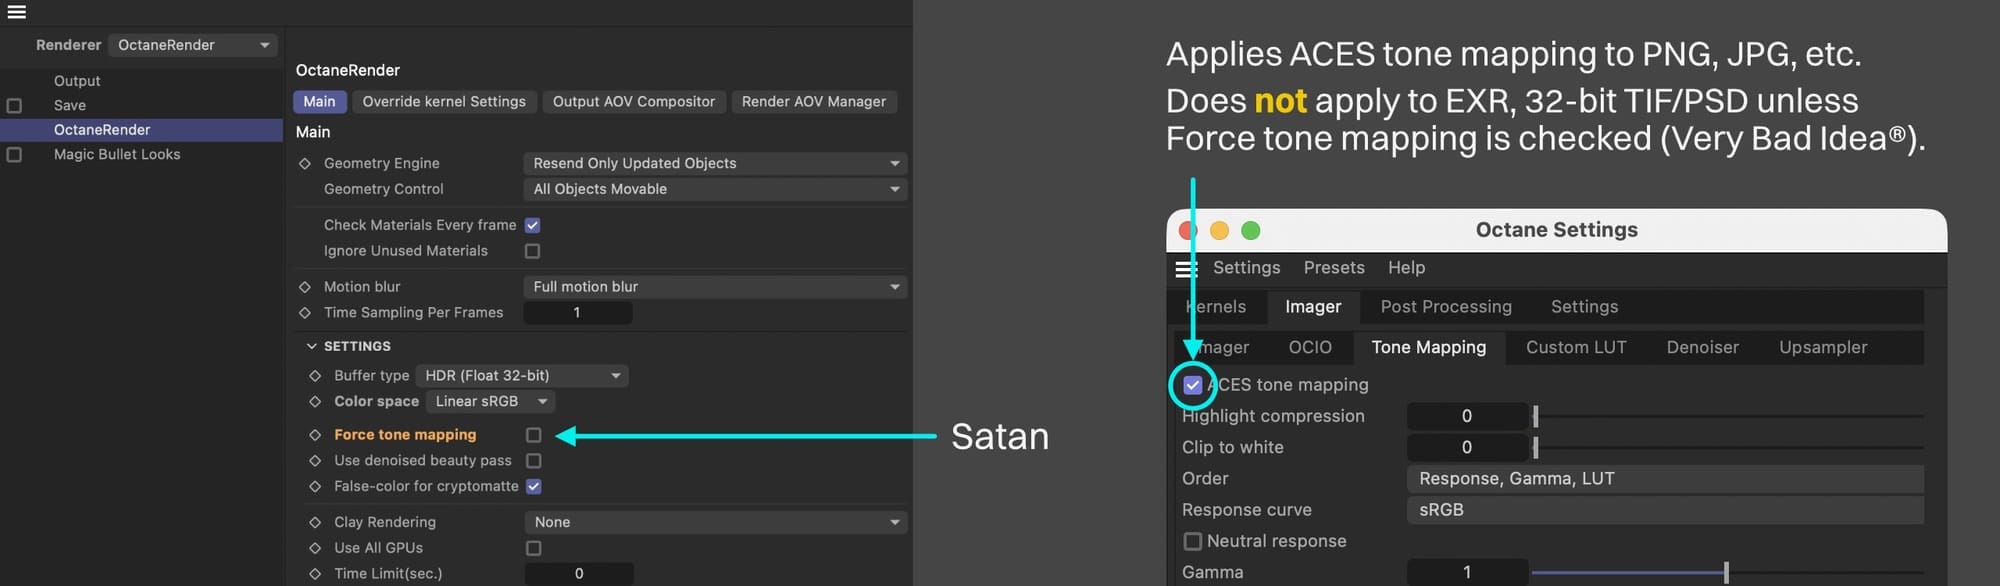
Tone mapping will not be baked into high bit depth (float-encoded) file types like EXR or 32-bit TIF/PSD unless “Force Tonemapping” is checked in the Main tab.
AGAIN, DO NOT DO THIS unless you seriously know what you’re doing and have a very good reason why you have to. Forcing tone mapping to a high bit depth file destroys data which defeats the point of having high bit depth files in the first place. These files exist so the tone mapping/transfer function/processing is done in the post app instead.
Force tone mapping only affects EXR (or other 32-bit formats), not PNG, JPEG, etc, since those are getting some form of tone mapping regardless - no need to force anything.
The ACES tone mapping checkbox in the Imager will apply ACES tone mapping to lower bit depth file types like PNG or JPEG, or 8-/16-bit TIF,/TGA/PSD, etc.
For AgX tone mapping we either need to use AOVs or an OCIO setup (both out of scope for this guide). For Octane’s Smooth tone mapping, we have to use AOVs.
In this guide, we’re trying to preserve a color, so we don’t want tone mapping. We want Cornflower Blue, and we’ll get this either by using sRGB and making sure ACES tone mapping is off (and the colors aren’t being altered using the imager or AOVs), or by using ACEScg/Linear sRGB, exporting as EXR, opening in post, and using that to do a hard sRGB conversion without tone mapping.
Wrap Up
If you got this far, you should be aware of several ways of getting an image out of Octane in C4D with the correct colors. It’s been a long and trying journey for our hero cube, but it’s better for it. In book III, we’ll enter the high castle of Picture Viewer and see what traps and tribulations await there!
Author Notes
This guide originally appeared on www.contextualguides.com and https://help.otoy.com/hc/en-us/categories/201718003-OctaneRender-Support-Guides
The written guide may be distributed freely and can be used for personal or professional training, but not modified or sold. The assets distributed within this guide are either generated specifically for this guide and released as CC0, or sourced from CC0 sites unless otherwise noted and attributed.
© 2026 Scott Benson, All rights reserved.